삽질특기생

다음에 삽질 덜하려고 만든 블로그

0%

k8s의 probe를 istio가 어떠한 방식으로 변환하여 app의 health check를 수행하는 지 알아보자

k8s probe

k8s probe 종류는 3가지가 있다

  • liveness
    살아있니? 나 혹시 얘 죽이고 다시 띄워야 하니?
  • readiness
    요청 받을 준비 됐니? 아직이면 얘 Service에서 지운다?
  • startup
    잘 떴니? 그래 애가 좀 느릴 수도 있지. 다 뜨면 그 때부터 liveness, readiness probe 할게

probe 방법은 4가지가 있다

  • exec
    커맨드를 실행해서 exit code가 0면 성공, 그 외 실패
  • httpGet
    http response code가 200 이상 ~ 400 미만이면 성공, 그 외 실패
  • tcpSocket
    socket open을 시도해서 connection이 수립되면 성공, 아니면 실패
  • grpc
    k8s 1.24부터 베타로 적용 됨. grpc health checking protocol을 구현해야 함

probe 옵션은 다음과 같다

  • initialDelaySeconds
    • probe 최초 수행 지연
    • default: 0 / min: 0
  • periodSeconds
    • probe 주기
    • default: 10 / min: 1
  • timeoutSeconds
    • probe timeout
    • deault: 1 / min: 1
  • successThreshold
    • probe가 몇 번 이상 성공해야 찐성공인지
    • default: 1 / liveness랑 startup은 무조건 1 / min: 1
  • failureThreshold
    • probe를 최대 몇 번 수행할 건지
    • default: 3 / min: 1

istio는 probe를 rewrite한다

그런데 주의할 점이 있다. probe는 kubelet이 수행한다.

The kubelet uses liveness probes to know when to restart a container.
For example, liveness probes could catch a deadlock, where an application is running, but unable to make progress.
Restarting a container in such a state can help to make the application more available despite bugs.

나는 service mesh를 지원하기 위해 istio를 설치하여 사용하고 있다
그런데 istio는 외부에서 container로 들어오는 트래픽을 sidecar로 redirect하며, kubelet이 보내는 요청도 마찬가지다!
http 요청의 경우 kubelet이 istio가 발급한 인증서가 없어서 실패할 수 있고(사실 뭔소린지 아직 모르겠음),
tcp 요청의 경우 모든 port가 open할 수 있는 것처럼 보여서 항상 성공한다
그래서 istio는 probe를 sidecar한테 보내도록 rewrite한다

Istio solves both these problems by rewriting the application PodSpec readiness/liveness probe, so that the probe request is sent to the sidecar agent. For HTTP requests, the sidecar agent redirects the request to the application and strips the response body, only returning the response code. For TCP probes, the sidecar agent will then do the port check while avoiding the traffic redirection.

tcp probe를 사용하는 예시

예를 들어 tcp probe를 사용하는 pod을 만들어보자

1
2
3
4
5
6
7
8
9
10
11
12
13
14
15
16
17
18
19
20
21
22
23
apiVersion: apps/v1
kind: Deployment
metadata:
name: probe-test
spec:
replicas: 1
selector:
matchLabels:
app: probe-test
template:
metadata:
labels:
app: probe-test
spec:
containers:
- name: test
image: nginx:latest
livenessProbe:
tcpSocket:
port: 80
readinessProbe:
tcpSocket:
port: 80

생성해보면

1
2
3
4
5
6
7
8
9
10
11
12
$ kubectl describe pod probe-test
Name: probe-test-5ff7c54648-6cj5v
### 생략 ###
Containers:
test:
Liveness: http-get http://:15020/app-health/test/livez delay=0s timeout=1s period=10s #success=1 #failure=3
Readiness: http-get http://:15020/app-health/test/readyz delay=0s timeout=1s period=10s #success=1 #failure=3
### 생략 ###
istio-proxy:
Environment:
ISTIO_KUBE_APP_PROBERS: {"/app-health/test/livez":{"tcpSocket":{"port":80},"timeoutSeconds":1},"/app-health/test/readyz":{"tcpSocket":{"port":80},"timeoutSeconds":1}}
### 생략 ###

test container의 liveness, readiness probe가 정의했던 것과 다르고,
istio-proxy container의 환경변수에 ISTIO_KUBE_APP_PROBERS의 value로 우리가 하려던 probe의 내용이 들어가있다.

istio 소스에서 관련있는 부분을 찾아보니, 아래와 같다.

1
2
3
4
5
6
// KubeAppProberEnvName is the name of the command line flag for pilot agent to pass app prober config.
// The json encoded string to pass app HTTP probe information from injector(istioctl or webhook).
// For example, ISTIO_KUBE_APP_PROBERS='{"/app-health/httpbin/livez":{"httpGet":{"path": "/hello", "port": 8080}}.
// indicates that httpbin container liveness prober port is 8080 and probing path is /hello.
// This environment variable should never be set manually.
KubeAppProberEnvName = "ISTIO_KUBE_APP_PROBERS"

(내부 구현은 잘은 모르겠으나) /app-healthz/{container name}/livez로 요청이 오면 우리가 지정했던 probe가 실행되도록 해놓은 것 같다

rewrite하지 않도록 하는 방법

만약 이렇게 istio가 probe를 rewrite하는 게 싫다면
spec.template.metadata.annotationssidecar.istio.io/rewriteAppHTTPProbers: "false"를 추가하면 된다

1
2
3
4
5
6
7
8
9
10
11
12
13
14
15
16
17
18
19
20
21
22
23
24
25
apiVersion: apps/v1
kind: Deployment
metadata:
name: probe-test
spec:
replicas: 1
selector:
matchLabels:
app: probe-test
template:
metadata:
labels:
app: probe-test
annotations:
sidecar.istio.io/rewriteAppHTTPProbers: "false"
spec:
containers:
- name: test
image: nginx:latest
livenessProbe:
tcpSocket:
port: 80
readinessProbe:
tcpSocket:
port: 80

생성해보면

1
2
3
4
5
6
7
8
9
10
11
$ kubectl describe pod probe-test
Name: probe-test-85479c6b4-tl7sm
### 생략 ###
Annotations: kubectl.kubernetes.io/default-container: test
sidecar.istio.io/rewriteAppHTTPProbers: false
### 생략 ###
Containers:
test:
Liveness: tcp-socket :80 delay=0s timeout=1s period=10s #success=1 #failure=3
Readiness: tcp-socket :80 delay=0s timeout=1s period=10s #success=1 #failure=3
### 생략 ###

test container에 우리가 정의한 대로 liveness, readiness probe가 들어가있고,
istio-proxy container의 환경변수에는 ISTIO_KUBE_APP_PROBERS가 등록되어있지 않다.

참고 자료

  • https://kubernetes.io/docs/tasks/configure-pod-container/configure-liveness-readiness-startup-probes/
  • https://istio.io/latest/docs/ops/configuration/mesh/app-health-check/#liveness-and-readiness-probes-using-the-http-request-approach

Express.js에서 res.응답메서드 호출 후 next()를 호출하지 않도록 해야한다.
res.응답메서드는 한 번만 쓸 수 있으며, res.send 후에 next()를 하면 다음 미들웨어에서 또 res.응답메서드 호출을 시도하므로 아래와 같은 에러를 출력한다.

1
Error [ERR_HTTP_HEADERS_SENT]: Cannot set headers after they are sent to the client

문제 상황

환경 세팅 중 crio가 다음과 같은 fatal log를 출력하고 종료되었다.

1
Dec 01 18:02:54 bp-master001 crio[8263]: time="2020-12-01 18:02:54.147849982+09:00" level=fatal msg="kernel does not support overlay fs: overlay: the backing xfs filesystem is formatted without d_type support, which leads to incorrect behavior. Reformat the filesystem with ftype=1 to enable d_type support. Running without d_type is not supported.: driver not supported"
backing filesystem으로 d_type을 지원하지 않는 xfs를 사용하면 비정상적인 동작으로 이끌 수 있으니,
ftype=1로 파일시스템을 다시 포맷하여 d_type 지원을 활성화시키라는 내용이다.

관련 이슈 확인

overlayfs에서 위와 같은 상황에서 삭제된 파일이 삭제되었다고 표시되지 않는 버그가 있다고 한다.

During mount, make sure upper fs supports d_type otherwise error out.
In some instances xfs has been created with ftype=0 and there if a file on lower fs is removed, overlay leaves a whiteout in upper fs but that whiteout does not get filtered out and is visible to overlayfs users.
And reason it does not get filtered out because upper filesystem does
not report file type of whiteout as DT_CHR during iterate_dir().
So it seems to be a requirement that upper filesystem support d_type for overlayfs to work properly. Do this check during mount and fail if d_type is not supported.

버그 재현

파티션 생성

테스트를 위한 새로운 파티션을 생성한다.

1
# fdisk /dev/sdb
생성 과정
1
2
3
4
5
6
7
8
9
10
11
12
13
14
15
16
17
18
19
20
21
22
23
24
25
26
[root@master ~]# fdisk /dev/sdb
Welcome to fdisk (util-linux 2.23.2).

Changes will remain in memory only, until you decide to write them.
Be careful before using the write command.

Device does not contain a recognized partition table
Building a new DOS disklabel with disk identifier 0x4aa3c9aa.

Command (m for help): n
Partition type:
p primary (0 primary, 0 extended, 4 free)
e extended
Select (default p): p
Partition number (1-4, default 1):
First sector (2048-16777215, default 2048):
Using default value 2048
Last sector, +sectors or +size{K,M,G} (2048-16777215, default 16777215):
Using default value 16777215
Partition 1 of type Linux and of size 8 GiB is set

Command (m for help): w
The partition table has been altered!

Calling ioctl() to re-read partition table.
Syncing disks.

xfs 생성

xfs 생성 시 ftype=0 옵션을 추가한다.
참고로 ftype=0은 crc=0도 추가해야한다.

1
# mkfs -t xfs -n ftype=0 /dev/sdb1
생성 과정
1
2
3
4
5
6
7
8
9
10
[root@master ~]# mkfs -t xfs -n ftype=0 -m crc=0 /dev/sdb1
meta-data=/dev/sdb1 isize=256 agcount=4, agsize=524224 blks
= sectsz=512 attr=2, projid32bit=1
= crc=0 finobt=0, sparse=0
data = bsize=4096 blocks=2096896, imaxpct=25
= sunit=0 swidth=0 blks
naming =version 2 bsize=4096 ascii-ci=0 ftype=0
log =internal log bsize=4096 blocks=2560, version=2
= sectsz=512 sunit=0 blks, lazy-count=1
realtime =none extsz=4096 blocks=0, rtextents=0
crc=0 없이 생성한 경우
1
2
3
4
5
6
7
8
9
10
11
12
13
14
15
16
17
18
19
20
21
22
23
24
25
26
27
28
[root@master ~]# mkfs -t xfs -n ftype=0 /dev/sdb1
cannot disable ftype with crcs enabled
Usage: mkfs.xfs
/* blocksize */ [-b log=n|size=num]
/* metadata */ [-m crc=0|1,finobt=0|1,uuid=xxx]
/* data subvol */ [-d agcount=n,agsize=n,file,name=xxx,size=num,
(sunit=value,swidth=value|su=num,sw=num|noalign),
sectlog=n|sectsize=num
/* force overwrite */ [-f]
/* inode size */ [-i log=n|perblock=n|size=num,maxpct=n,attr=0|1|2,
projid32bit=0|1]
/* no discard */ [-K]
/* log subvol */ [-l agnum=n,internal,size=num,logdev=xxx,version=n
sunit=value|su=num,sectlog=n|sectsize=num,
lazy-count=0|1]
/* label */ [-L label (maximum 12 characters)]
/* naming */ [-n log=n|size=num,version=2|ci,ftype=0|1]
/* no-op info only */ [-N]
/* prototype file */ [-p fname]
/* quiet */ [-q]
/* realtime subvol */ [-r extsize=num,size=num,rtdev=xxx]
/* sectorsize */ [-s log=n|size=num]
/* version */ [-V]
devicename
<devicename> is required unless -d name=xxx is given.
<num> is xxx (bytes), xxxs (sectors), xxxb (fs blocks), xxxk (xxx KiB),
xxxm (xxx MiB), xxxg (xxx GiB), xxxt (xxx TiB) or xxxp (xxx PiB).
<value> is xxx (512 byte blocks).

fstab에 mount 정보 추가 및 적용

1
2
3
4
5
6
7
8
9
10
11
12
13
14
[root@master ~]# vi /etc/fstab
/dev/sdb1 /root/ftype0 xfs defaults 0 0
[root@master ~]# mkdir /root/ftype0
[root@master ~]# mount -a
[root@master ~]# xfs_info /root/ftype0
meta-data=/dev/sdb1 isize=256 agcount=4, agsize=524224 blks
= sectsz=512 attr=2, projid32bit=1
= crc=0 finobt=0 spinodes=0
data = bsize=4096 blocks=2096896, imaxpct=25
= sunit=0 swidth=0 blks
naming =version 2 bsize=4096 ascii-ci=0 ftype=0
log =internal bsize=4096 blocks=2560, version=2
= sectsz=512 sunit=0 blks, lazy-count=1
realtime =none extsz=4096 blocks=0, rtextents=0
(참고) root는 ftyep=1이다
1
2
3
4
5
6
7
8
9
10
[root@master ~]# xfs_info /
meta-data=/dev/mapper/centos-root isize=512 agcount=4, agsize=406016 blks
= sectsz=512 attr=2, projid32bit=1
= crc=1 finobt=0 spinodes=0
data = bsize=4096 blocks=1624064, imaxpct=25
= sunit=0 swidth=0 blks
naming =version 2 bsize=4096 ascii-ci=0 ftype=1
log =internal bsize=4096 blocks=2560, version=2
= sectsz=512 sunit=0 blks, lazy-count=1
realtime =none extsz=4096 blocks=0, rtextents=0

파일 삭제 후 동작 확인

overlay 디렉토리에서 lower 디렉토리에 있는 파일을 삭제한 뒤 조회하면, 삭제했던 파일이 비정상적으로 조회된다.

1
2
3
4
5
6
7
8
9
10
11
12
13
14
15
16
17
18
19
[root@master ftype0]# mkdir overlay-test overlay-test/lower overlay-test/upper overlay-test/workdir overlay-test/overlay
[root@master ftype0]# cd overlay-test/
[root@master overlay-test]# touch lower/lower
[root@master overlay-test]# mount -t overlay -o lowerdir=/root/ftype0/overlay-test/lower,\
> upperdir=/root/ftype0/overlay-test/upper,workdir=/root/ftype0/overlay-test/workdir \
> none /root/ftype0/overlay-test/overlay
[root@master overlay-test]# ls -al overlay/
합계 0
drwxr-xr-x. 1 root root 6 12월 5 02:05 .
drwxr-xr-x. 6 root root 58 12월 5 02:05 ..
-rw-r--r--. 1 root root 0 12월 5 02:05 lower
[root@master overlay-test]# rm overlay/lower
rm: remove 일반 빈 파일 `overlay/lower'? y
[root@master overlay-test]# ls -al overlay/
ls: cannot access overlay/lower: 그런 파일이나 디렉터리가 없습니다
합계 0
drwxr-xr-x. 1 root root 18 12월 5 02:06 .
drwxr-xr-x. 6 root root 58 12월 5 02:05 ..
??????????? ? ? ? ? ? lower
(참고) 정상 시나리오 - ftype=1인 디렉토리에서 overlayfs 동작 확인

삭제된 파일이 조회되지 않는다.

1
2
3
4
5
6
7
8
9
10
11
12
13
14
15
16
17
[root@master ~]# mkdir overlay-test overlay-test/lower overlay-test/upper overlay-test/workdir overlay-test/overlay
[root@master ~]# cd overlay-test/
[root@master overlay-test]# touch lower/lower
[root@master overlay-test]# mount -t overlay -o lowerdir=/root/overlay-test/lower,\
> upperdir=/root/overlay-test/upper,workdir=/root/overlay-test/workdir \
> none /root/overlay-test/overlay
[root@master overlay-test]# ls -al overlay/
합계 0
drwxr-xr-x. 1 root root 6 12월 5 02:01 .
drwxr-xr-x. 6 root root 62 12월 5 02:01 ..
-rw-r--r--. 1 root root 0 12월 5 02:01 lower
[root@master overlay-test]# rm overlay/lower
rm: remove 일반 빈 파일 `overlay/lower'? y
[root@master overlay-test]# ls -al overlay/
합계 0
drwxr-xr-x. 1 root root 19 12월 5 02:02 .
drwxr-xr-x. 6 root root 62 12월 5 02:01 ..

유관 프로젝트의 대처

레드햇의 경우 xfs 파일시스템을 사용할 때 주의 사항을 문서에 명시되어있고,
Docker 역시 overlayfs storage driver를 사용할 때 주의 사항이 공식 홈페이지에 명시되어있다.

이러한 버그가 알려져있기 때문에, docker와 cri-o에서는 앞서 소개했었던 fatal log 내용처럼 사전에 확인하는 과정을 추가한 것으로 보인다.

결론

overlayfs의 backing filesystem으로 xfs 파일 시스템을 사용할 때는, xfs 포맷 시 ftype=1을 반드시 추가하자.

Kubernetes의 Resource Management

Kubernetes에서 resource management하는 것에 대해 정리해보고자 한다. 꽤나 복잡해서 하나의 포스팅으로는 끝나지 않을 것 같아 내용을 나눈다.
이번 포스팅은 pod의 spec 중 container별로 설정할 수 있는 resource requests와 limits에 대한 내용이다.

Resource Requests & Limits

Kubernetes에서 pod의 spec을 정의할 때, container별로 CPU와 Memory에 대해서 requests와 limits를 설정할 수 있다.

1
2
3
4
5
6
7
8
9
10
11
12
13
14
15
16
17
apiVersion: v1
kind: Pod
metadata:
name: simple-pod
spec:
containers:
- name: simple-pod-ctr
image: busybox
stdin: true
tty: true
resources:
requests:
cpu: 0.5
memory: 300Mi
limits:
cpu: 1
memory: 500Mi

CPU의 경우 단위는 core이고, 0.1과 100m, 100 millicore는 모두 같은 값을 의미한다.
Memory의 경우 단위는 byte이다.

Requests

Requests는 pod을 scheduling할 때 참고하며, 실제 container process의 사용량이 이것을 넘는 것은 중요하지 않다.
사용자가 생각할 때 ‘이 container는 이 정도의 자원을 필요로 할 것이다’라는 예상치로 정하는 값이다. Soft limit정도로 생각하면 된다.

  • cgroup에 설정되는 값

    CPU의 경우 cpu.shares 값이 설정된다. 만약 container1은 CPU requests로 0.5를, container2는 CPU requests로 1을 지정했다면, A와 B는 1:2의 비율로 스케줄링된다.
    Memory는 별도로 설정하는 값이 없다.

    • 테스트한 conainer yaml
      1
      2
      3
      4
      5
      6
      7
      8
      9
      10
      11
      12
      13
      14
      15
      16
      17
      18
      19
      20
      21
      22
      apiVersion: v1
      kind: Pod
      metadata:
      name: request-test
      spec:
      containers:
      - name: request-test-ctr-1
      image: busybox
      stdin: true
      tty: true
      resources:
      requests:
      cpu: 0.5
      memory: 300Mi
      - name: request-test-ctr-2
      image: busybox
      stdin: true
      tty: true
      resources:
      requests:
      cpu: 1
      memory: 300Mi
    • cgroup 확인
      • pod uuid와 docker container uuid 확인

        docker ps

        다른 방법들이 많겠지만 나는 그냥 worker node로 접속해서 docker ps를 쳐서 알아내는 편이다.
        Docker container name의 형식은 k8s_{container name}{pod name}{namespace}_{pod uuid}이다.

      • 해당 pod의 cgroup 접근

        pod cgroup

        • 참고) kubernetes cgroup layout (v1.17 기준)
          1
          2
          3
          4
          5
          6
          7
          8
          9
          10
          11
          12
          13
          14
          15
          16
          kubepods
          \_ besteffort
          \_ pod{uuid}
          \_ {container uuid}
          \_ {pause container uuid}
          \_ ...
          \_ burstable
          \_ pod{uuid}
          \_ {container uuid}
          \_ {pause container uuid}
          \_ ...
          \_ pod{uuid} # guaranteed pods
          \_ {container uuid}
          \_ {pause container uuid}
          \_ ...
          \_ ...
          /sys/fs/cgroup/{resource type}/kubepods/{QoS class}/pod{pod uuid}이다.
          QoS class가 BestEffort, Burstable, Guaranteed가 있으며, Guaranteed의 경우 추가 cgroup 없이 바로 pod cgroup이 위치한다.
          kubepods의 cpu.shares는 {node의 core 수} * 1024, besteffort의 cpu.shares는 2, burstable의 cpu.shares는 256이다. guaranteed cgroup이 따로 없고 바로 pod cgroup이 있는 건 kubernetes가 (같은 core에 대해 경쟁해야하는 상황인 경우)guaranteed pod에게 최대한 자원을 보장하겠다는 의지가 반영된 것이 아닐까 싶다. kubepod의 cpu.shares 수치로 보아서 해당 node는 온전히 kubernetes만을 위한 것이라고 생각하는 것이 아닐까. 뭐 이건 다 추측이다.
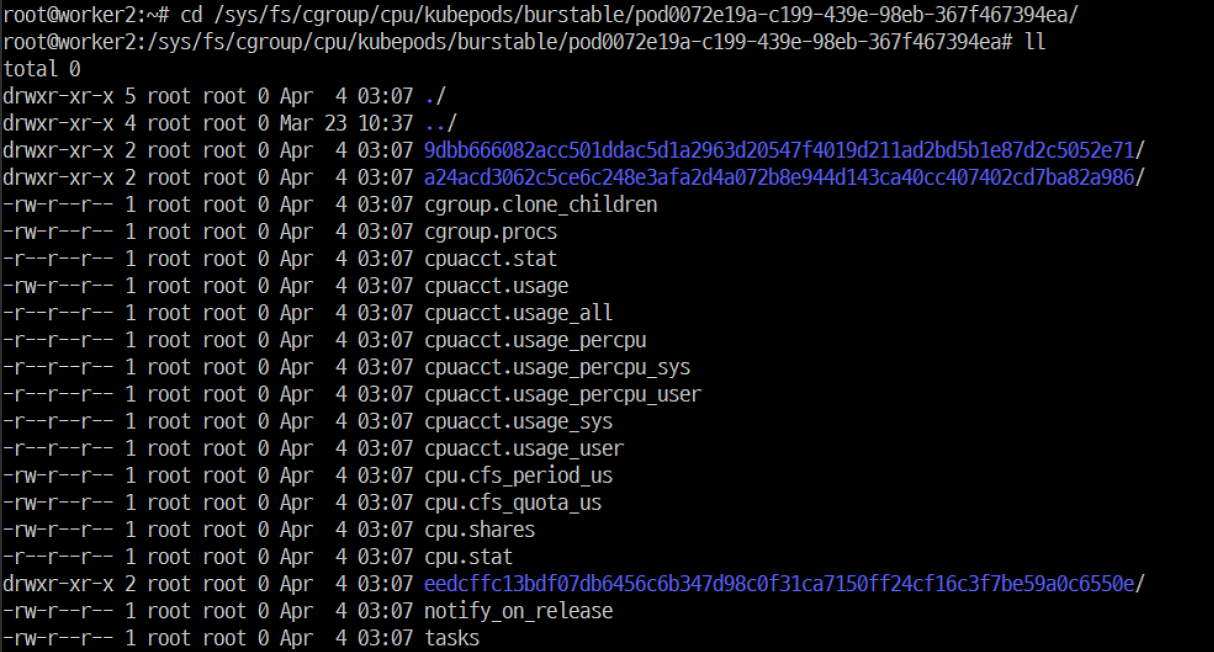
      • container별 cpu.shares 확인

        cpu.shares

        Pod cgroup의 cpu.shares는 1536, container1 cgroup의 것은 512, container2 cgroup의 것은 1024, pause container의 것은 2가 설정되어 있다.
        Kubernetes는 container별로 cpu.shares를 {CPU requests} * 1024 값으로 설정하고, pod의 cpu.shares는 이렇게 request가 지정된 container의 cpu.shares의 합으로 설정한다. (1536 = 512 + 1024)

        만약 requests를 설정하지 않으면 2이며, 이 때는 pod cgroup에 합산하지 않는다.
        만약 container1의 cpu request를 0.5, container2는 request를 설정하지 않았으면, pod의 cpu.shares는 512이다.
        만약 container 1과 2 둘 다 request를 설정하지 않았으면, pod의 cpu.shares는 2이다.
        (이러한 계산은 실험공학으로 알아낸 것이므로, 정확한 알고리즘은 나중에 코드를 확인해봐야할 것 같다.)

Limits

Limits는 container의 cgroup을 설정할 때 참고하는 값이므로, 실제 container process의 사용량은 이것을 넘지 못한다. Hard limit정도로 생각하면 된다.
Requests를 설정했다면 limits는 requests보다 크거나 같은 값이어야 한다. (Requests를 더 큰 값으로 설정할 경우 deploy 시 에러가 발생한다.)
Requests를 설정하지 않은 채 limits를 설정한다면, requests는 limits와 동일한 값으로 설정된다.
참고로 requests는 설정했지만 limits를 설정하지 않을 수도 있다. 물론 둘 다 설정하지 않아도 된다. CPU와 Memory 둘 중에 하나만 설정할 수도 있다.
(어떻게 설정하느냐에 따라서 아까 언급했던 QoS class가 나뉘는데, 이 역시 다른 포스팅에서…)

  • cgroup에 설정되는 값

    CPU의 경우 CPU bandwidth quota인 cpu.cfs_quota_us 값이 설정된다.
    Memory의 경우 memory 사용률 제한인 memory.limit_in_bytes 값이 설정된다.

    • 테스트한 conainer yaml
      1
      2
      3
      4
      5
      6
      7
      8
      9
      10
      11
      12
      13
      14
      apiVersion: v1
      kind: Pod
      metadata:
      name: request-test
      spec:
      containers:
      - name: request-test-ctr-1
      image: busybox
      stdin: true
      tty: true
      resources:
      limits:
      cpu: 0.5
      memory: 300Mi
    • cgroup 확인
      • container별 cpu.cfs_quota_us 확인

        cpu.cfs_quota_us

        Pod의 quota는 50000, container1의 quota도 50000, pause container의 quota는 설정하지 않는다(-1).
        Kubernetes는 cfs_quota_us를 {CPU limit} * {cfs_period_us}로 설정하고, cfs_period_us는 kernel default값인 100000을 그대로 사용한다.

        참고로 cfs_quota_us는 -1일 때는 bandwidth 제한을 하지 않는다.
        만약 CPU limit을 주지 않을 경우 cfs_quota_us는 -1로 설정된다.

      • container별 memory.limit_in_bytes 확인

        memory.limit_in_bytes

        Pod의 limit은 314572800, container1의 limit도 314572800, pause container의 경우 설정하지 않는다.
        Kubernetes는 memory.limit_in_bytes를 Memory limit값을 byte로 변환하여 설정한다.

Memory stress test

  • 시나리오

    1. request & limit 설정하지 않았는데 out-of-memory가 발생하는 경우
    2. request 값 < 실 사용량
    3. limit 값 < 실 사용량
  • 테스트 과정

    1. request & limit 설정하지 않았는데 out-of-memory가 발생하는 경우

      • test한 yaml
        1
        2
        3
        4
        5
        6
        7
        8
        9
        10
        11
        apiVersion: v1
        kind: Pod
        metadata:
        name: memory-demo
        spec:
        restartPolicy: Never
        containers:
        - name: memory-demo-ctr
        image: polinux/stress
        command: ["stress"]
        args: ["--vm", "1", "--vm-bytes", "1700M", "--vm-hang", "1"]
      • 테스트 결과
        • Pod describe 결과

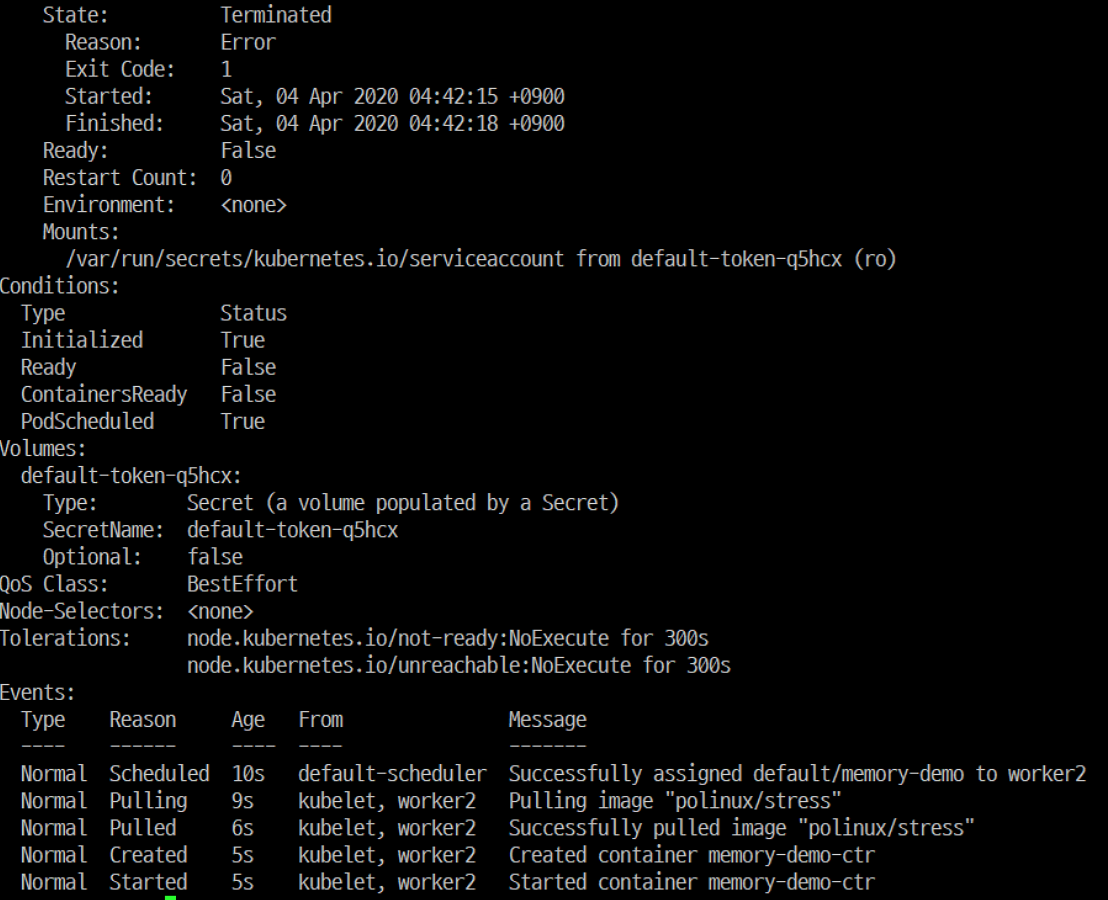
          mem stress test1

          해당 pod을 describe해보면 State가 Terminated로 바뀌었고, Reason이 Error라고 명시되어있다.

        • OOM killer 동작 여부 확인

          dmesg 확인

    2. request만 설정하는 경우

      • test한 yaml

        1
        2
        3
        4
        5
        6
        7
        8
        9
        10
        11
        12
        13
        14
        apiVersion: v1
        kind: Pod
        metadata:
        name: memory-demo
        spec:
        restartPolicy: Never
        containers:
        - name: memory-demo-ctr
        image: polinux/stress
        resources:
        requests:
        memory: 300Mi
        command: ["stress"]
        args: ["--vm", "1", "--vm-bytes", "500M", "--vm-hang", "1"]

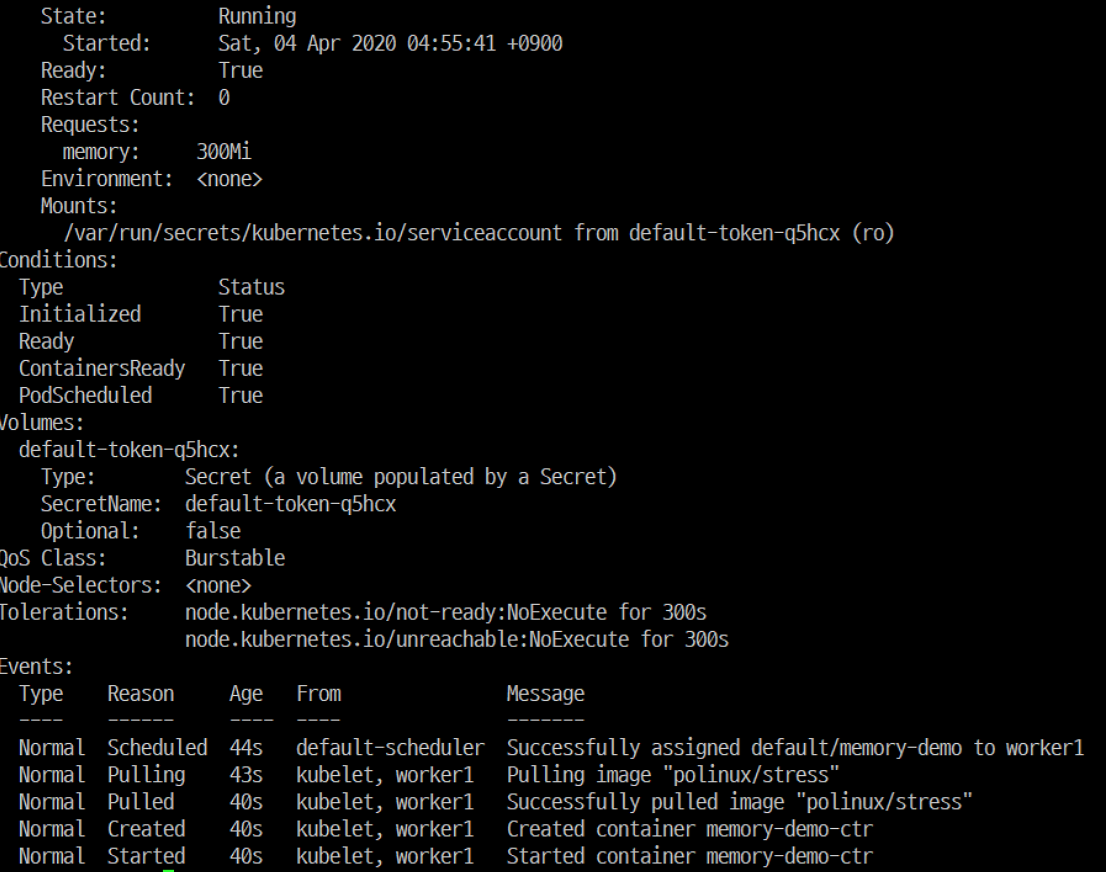
        mem stress test2

        해당 pod을 describe해보면 State는 Running으로, 아무런 일도 일어나지 않았다.

    3. limit 설정하는 경우

      • test한 yaml

        1
        2
        3
        4
        5
        6
        7
        8
        9
        10
        11
        12
        13
        14
        apiVersion: v1
        kind: Pod
        metadata:
        name: memory-demo
        spec:
        restartPolicy: Never
        containers:
        - name: memory-demo-ctr
        image: polinux/stress
        resources:
        limits:
        memory: 300Mi
        command: ["stress"]
        args: ["--vm", "1", "--vm-bytes", "500M", "--vm-hang", "1"]
      • 테스트 결과

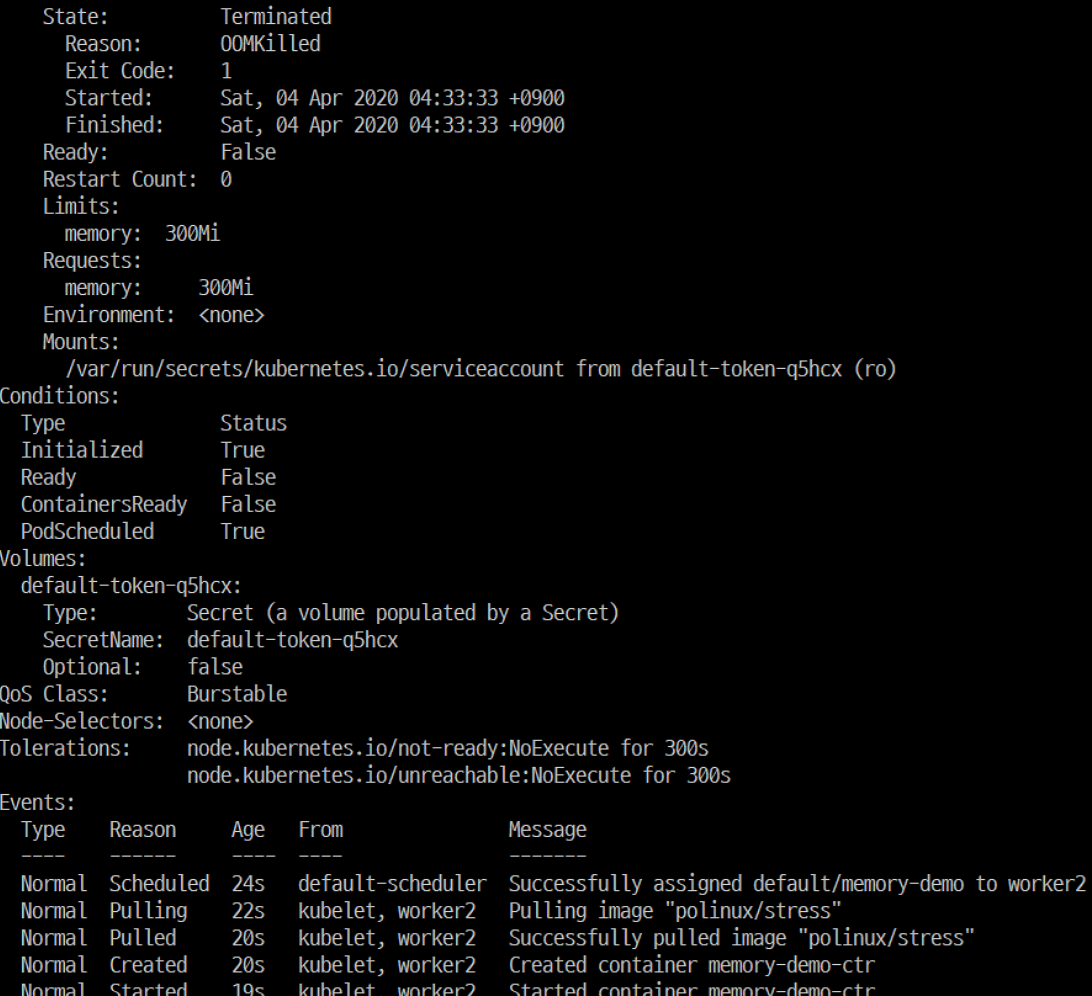
        mem stress test3

        해당 pod을 describe해보면 State가 Terminated로 바뀌었고, Reason이 OOMkilled라고 명시되어있다.
        OOM killer 역시 동작했다.

        mem stress test3 dmesg

오픈소스에서 버그나 오타를 발견하는 건 사막에서 바늘 찾기라고만 생각했다.
그래서 오픈소스에 컨트리뷰트하는 건 나한테는 불가능한 일이고, 대단한 사람들만 하는 것이라고 생각했다.
그런데 나에게도 그런 일이 일어났다.

토요일 아침 7시에 오타를 발견하다

답답함에 못이겼는지 토요일인데도 아침 일찍 눈이 번쩍 떠졌다.
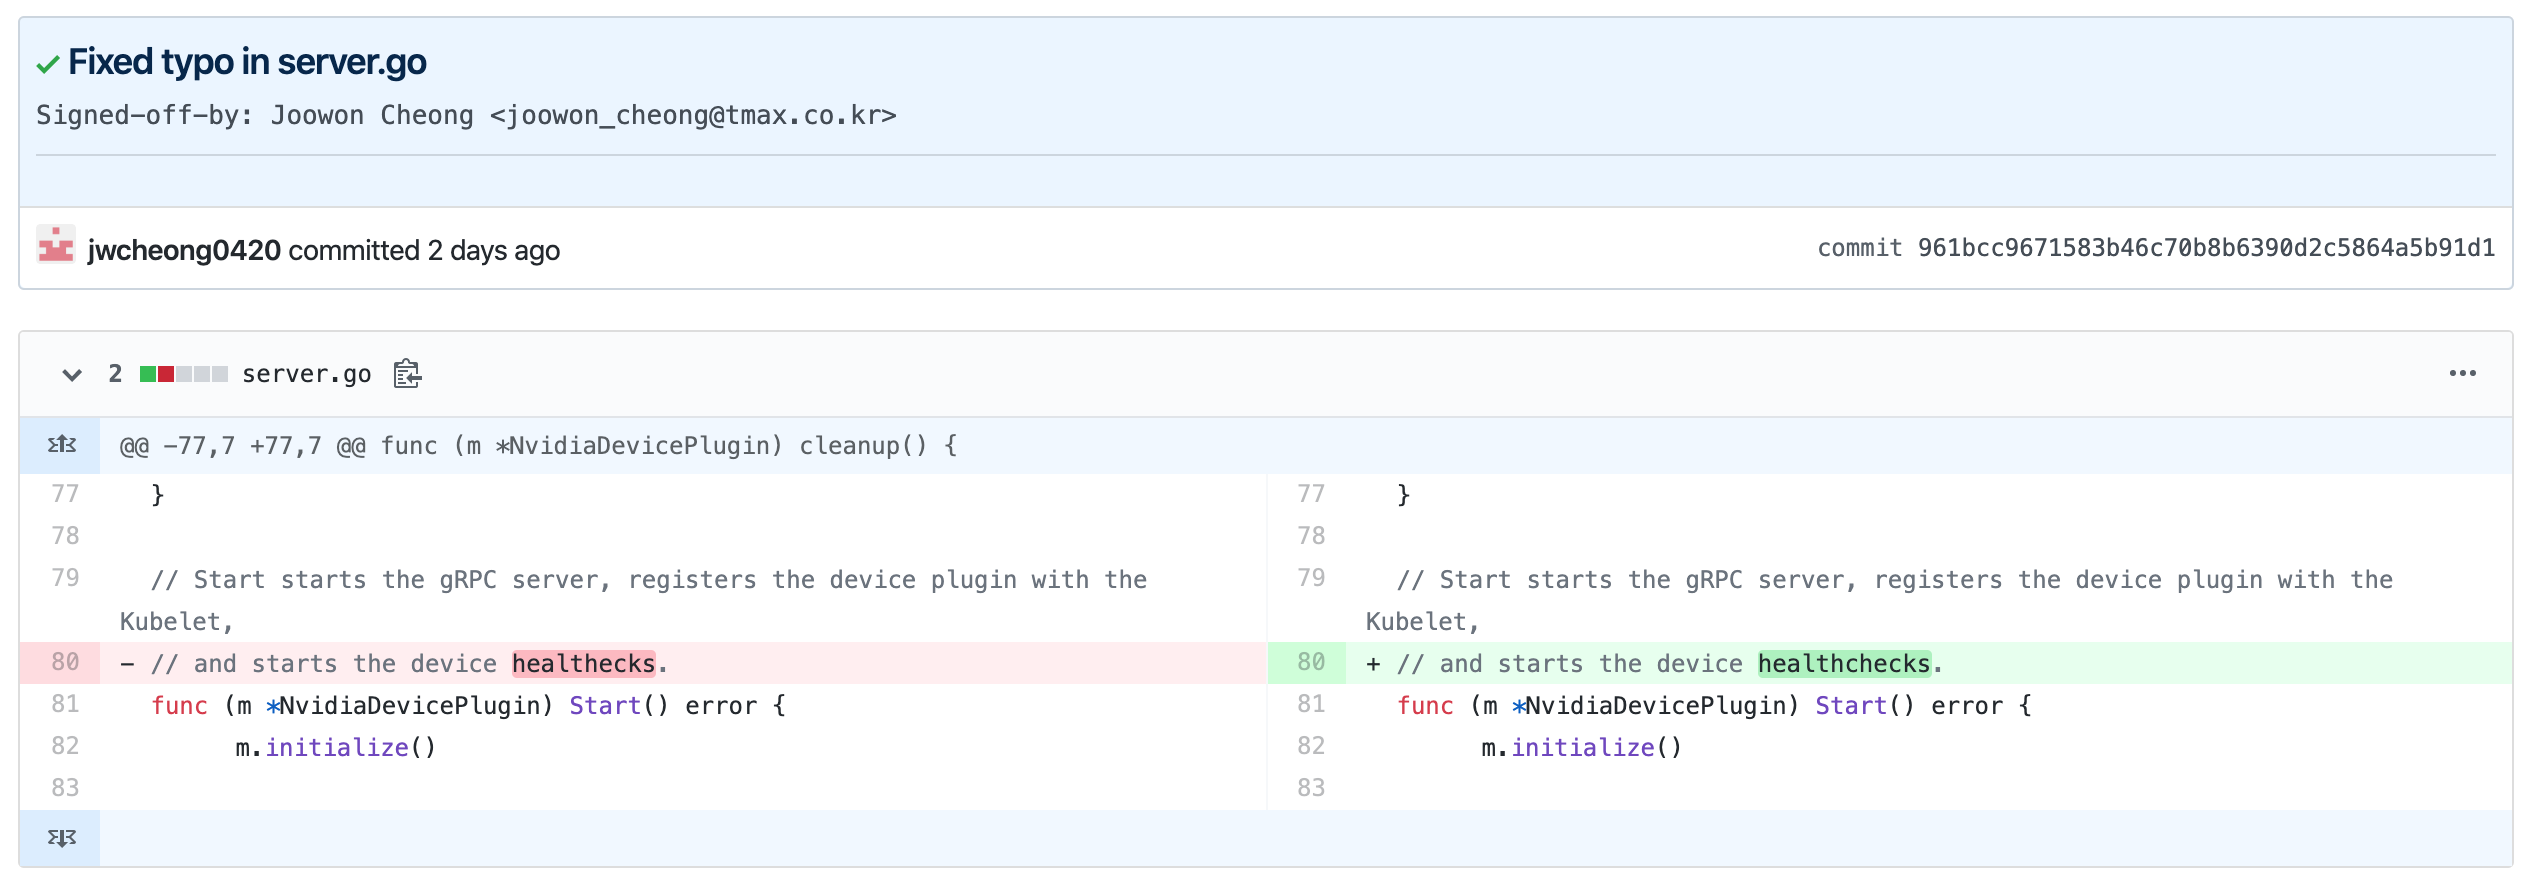
나에게 주어진 일이나 잘하자 하고 마음을 다잡으며 nvidia의 gpu device plugin 코드를 분석하려 했는데, 우연찮게 오타를 발견했다!
found-typo

healtheck라니, healtheck라니!
혹시나 내가 healthcheck라고 잘못 알고 있었나 별 생각을 다하면서, 저 부분을 몇 번이고 다시 읽고 구글링도 해보았다ㅋㅋㅋㅋㅋ
생각보다 꽤 잘 오타가 나는 부분인지, healthcheck를 여러 번 타이핑할 때 healtheck라고 한 번씩 등장하는 모습을 볼 수 있었다.
일단 해보자! 만약 오타가 아니라면 PR(Pull Request)가 받아들여지지 않거나 하겠지. 라는 생각으로 나의 첫 오픈소스 컨트리뷰트 도전이 시작되었다.

Contribute 1차 시도

README.md 및 CONTRIBUTING.md 읽기

우선 오픈소스의 README와 CONTRIBUTING 문서를 살펴보았다.
README에는 CONTRIBUTING 문서를 살펴보고 PR로 컨트리뷰트하면 된다는 짤막한 문구가 있었고,
README - contributing
CONTRIBUTING에는 오픈소스에 제출한 나의 코드에 대한 권리(정확한 내용은 모르겠다…)에 대해 commit message에 내 실명을 넣은 한 줄을 추가하면 된단다.
CONTRIBUTING - sign off

오픈소스 프로젝트 fork하여 작업하기

해당 오픈소스의 github 프로젝트를 fork하고, fix-typo라는 브랜치를 따서 작업했다.
규칙대로 commit message에는 sign off 한 줄 추가 완료!
first commit

Pull Request를 올렸다!

PR을 올리고 얼마나 두근대던지, 테스팅 파이프라인을 계속 쳐다보고 별 쇼를 다했다ㅋㅋㅋㅋ
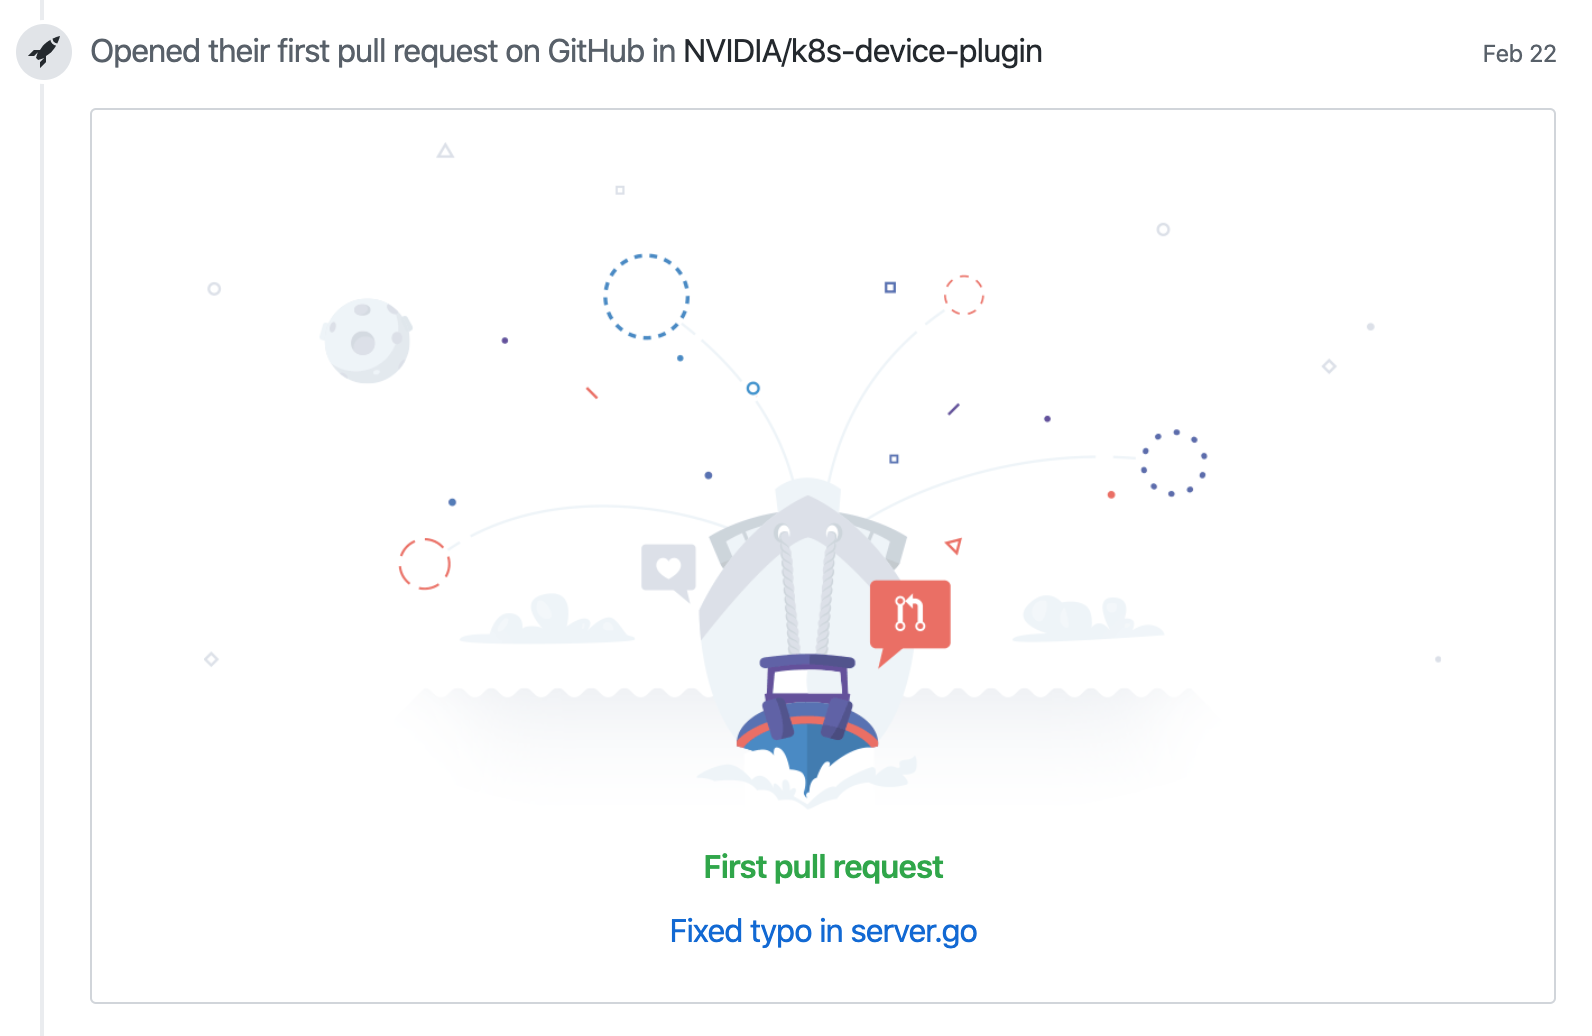
그리고 PR을 올리니까 내 contribution activity에 이런 이력도 추가되었다 :)
first pull request

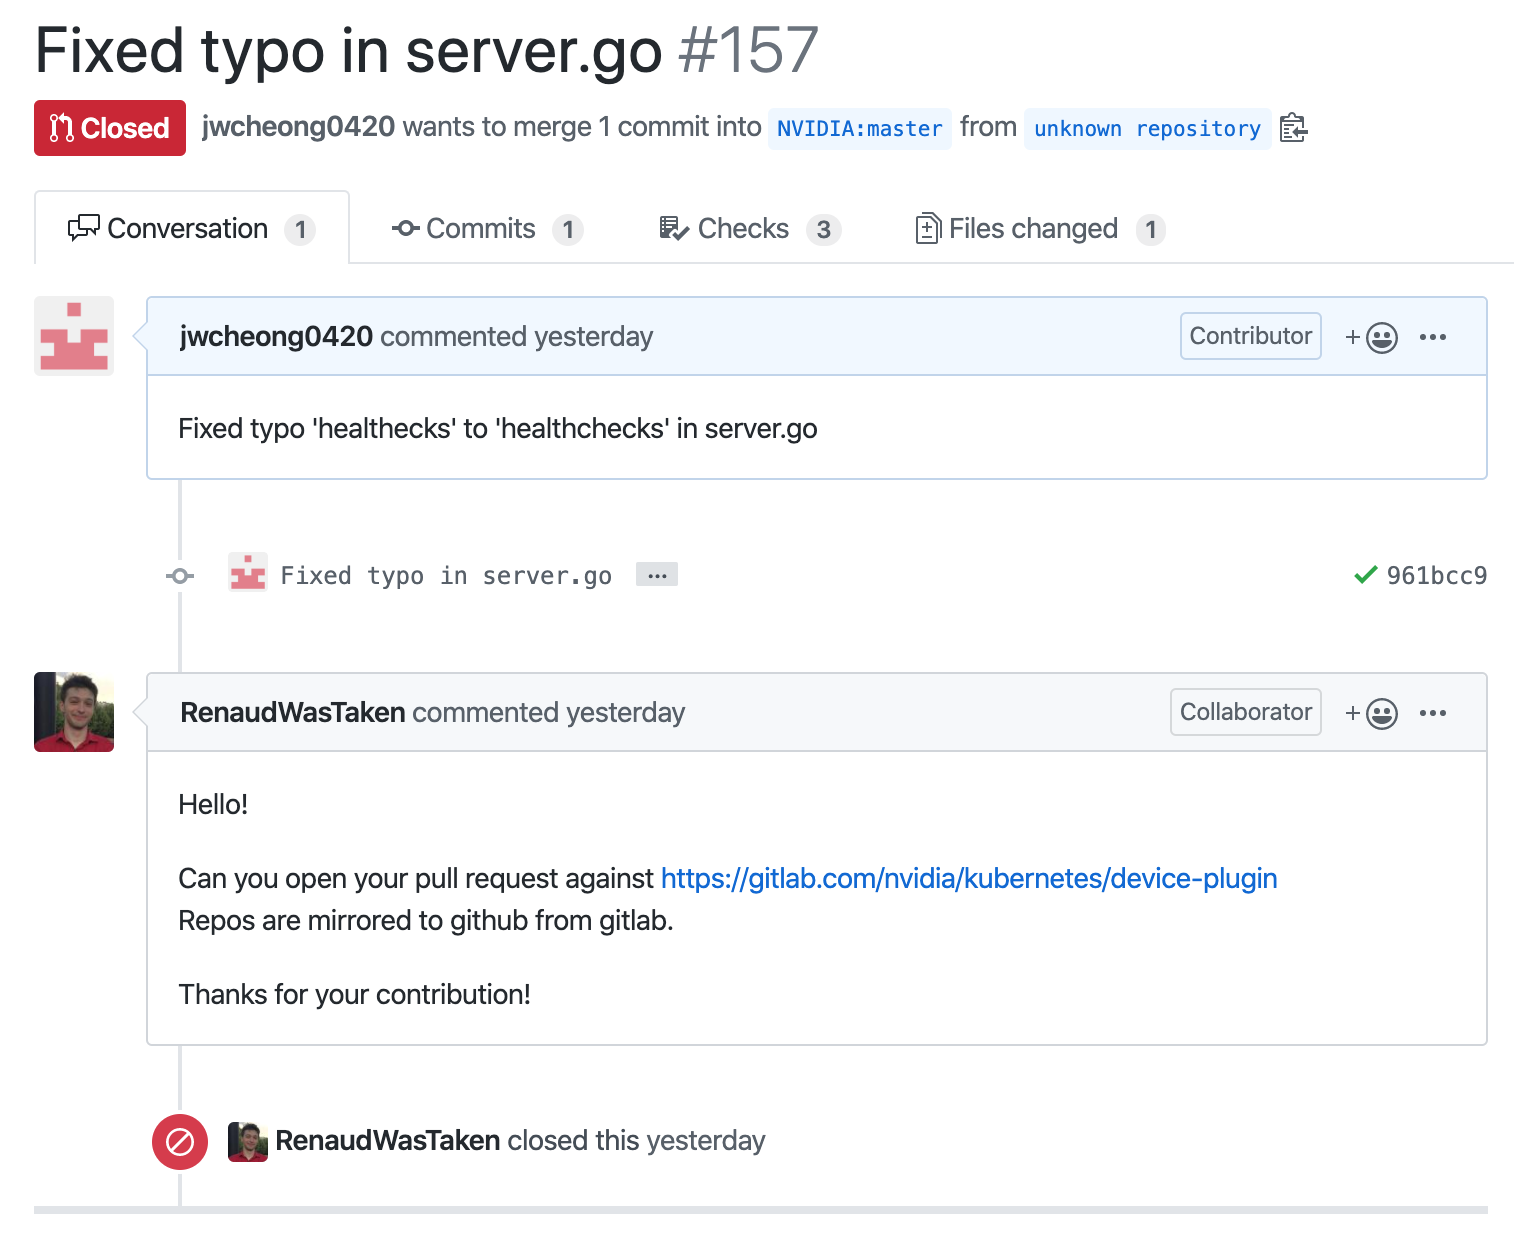
읭 Merged가 아니라 왜 Closed냐옹

30여분 지났는데 해당 오픈소스 collaborator가 답변을 달았다.
꽤나 빠른 응답시간에 놀랐고, 답변에 당황했다.
pull request closed
github은 gitlab의 것을 mirror한 것이니, gitlab에 다시 해달란다.
어… gitlab으로 오픈소스 컨트리뷰트하는 후기들은 못봤는디요… 등에서 식은땀이 흘렀다.

Contribute 2차 시도

gitlab 가입하기

구글링해보니 gitlab의 프로젝트를 github으로 옮기는 케이스는 꽤 많은 것 같았다.
우선 gitlab에는 회사 메일로 된 계정밖에 없어서 이 기회에 만들었다.
혹시 모르니 github과 동일한 아이디와 메일을 사용하도록 가입했다.

오픈소스 프로젝트 fork하여 작업하고, MR 올리기

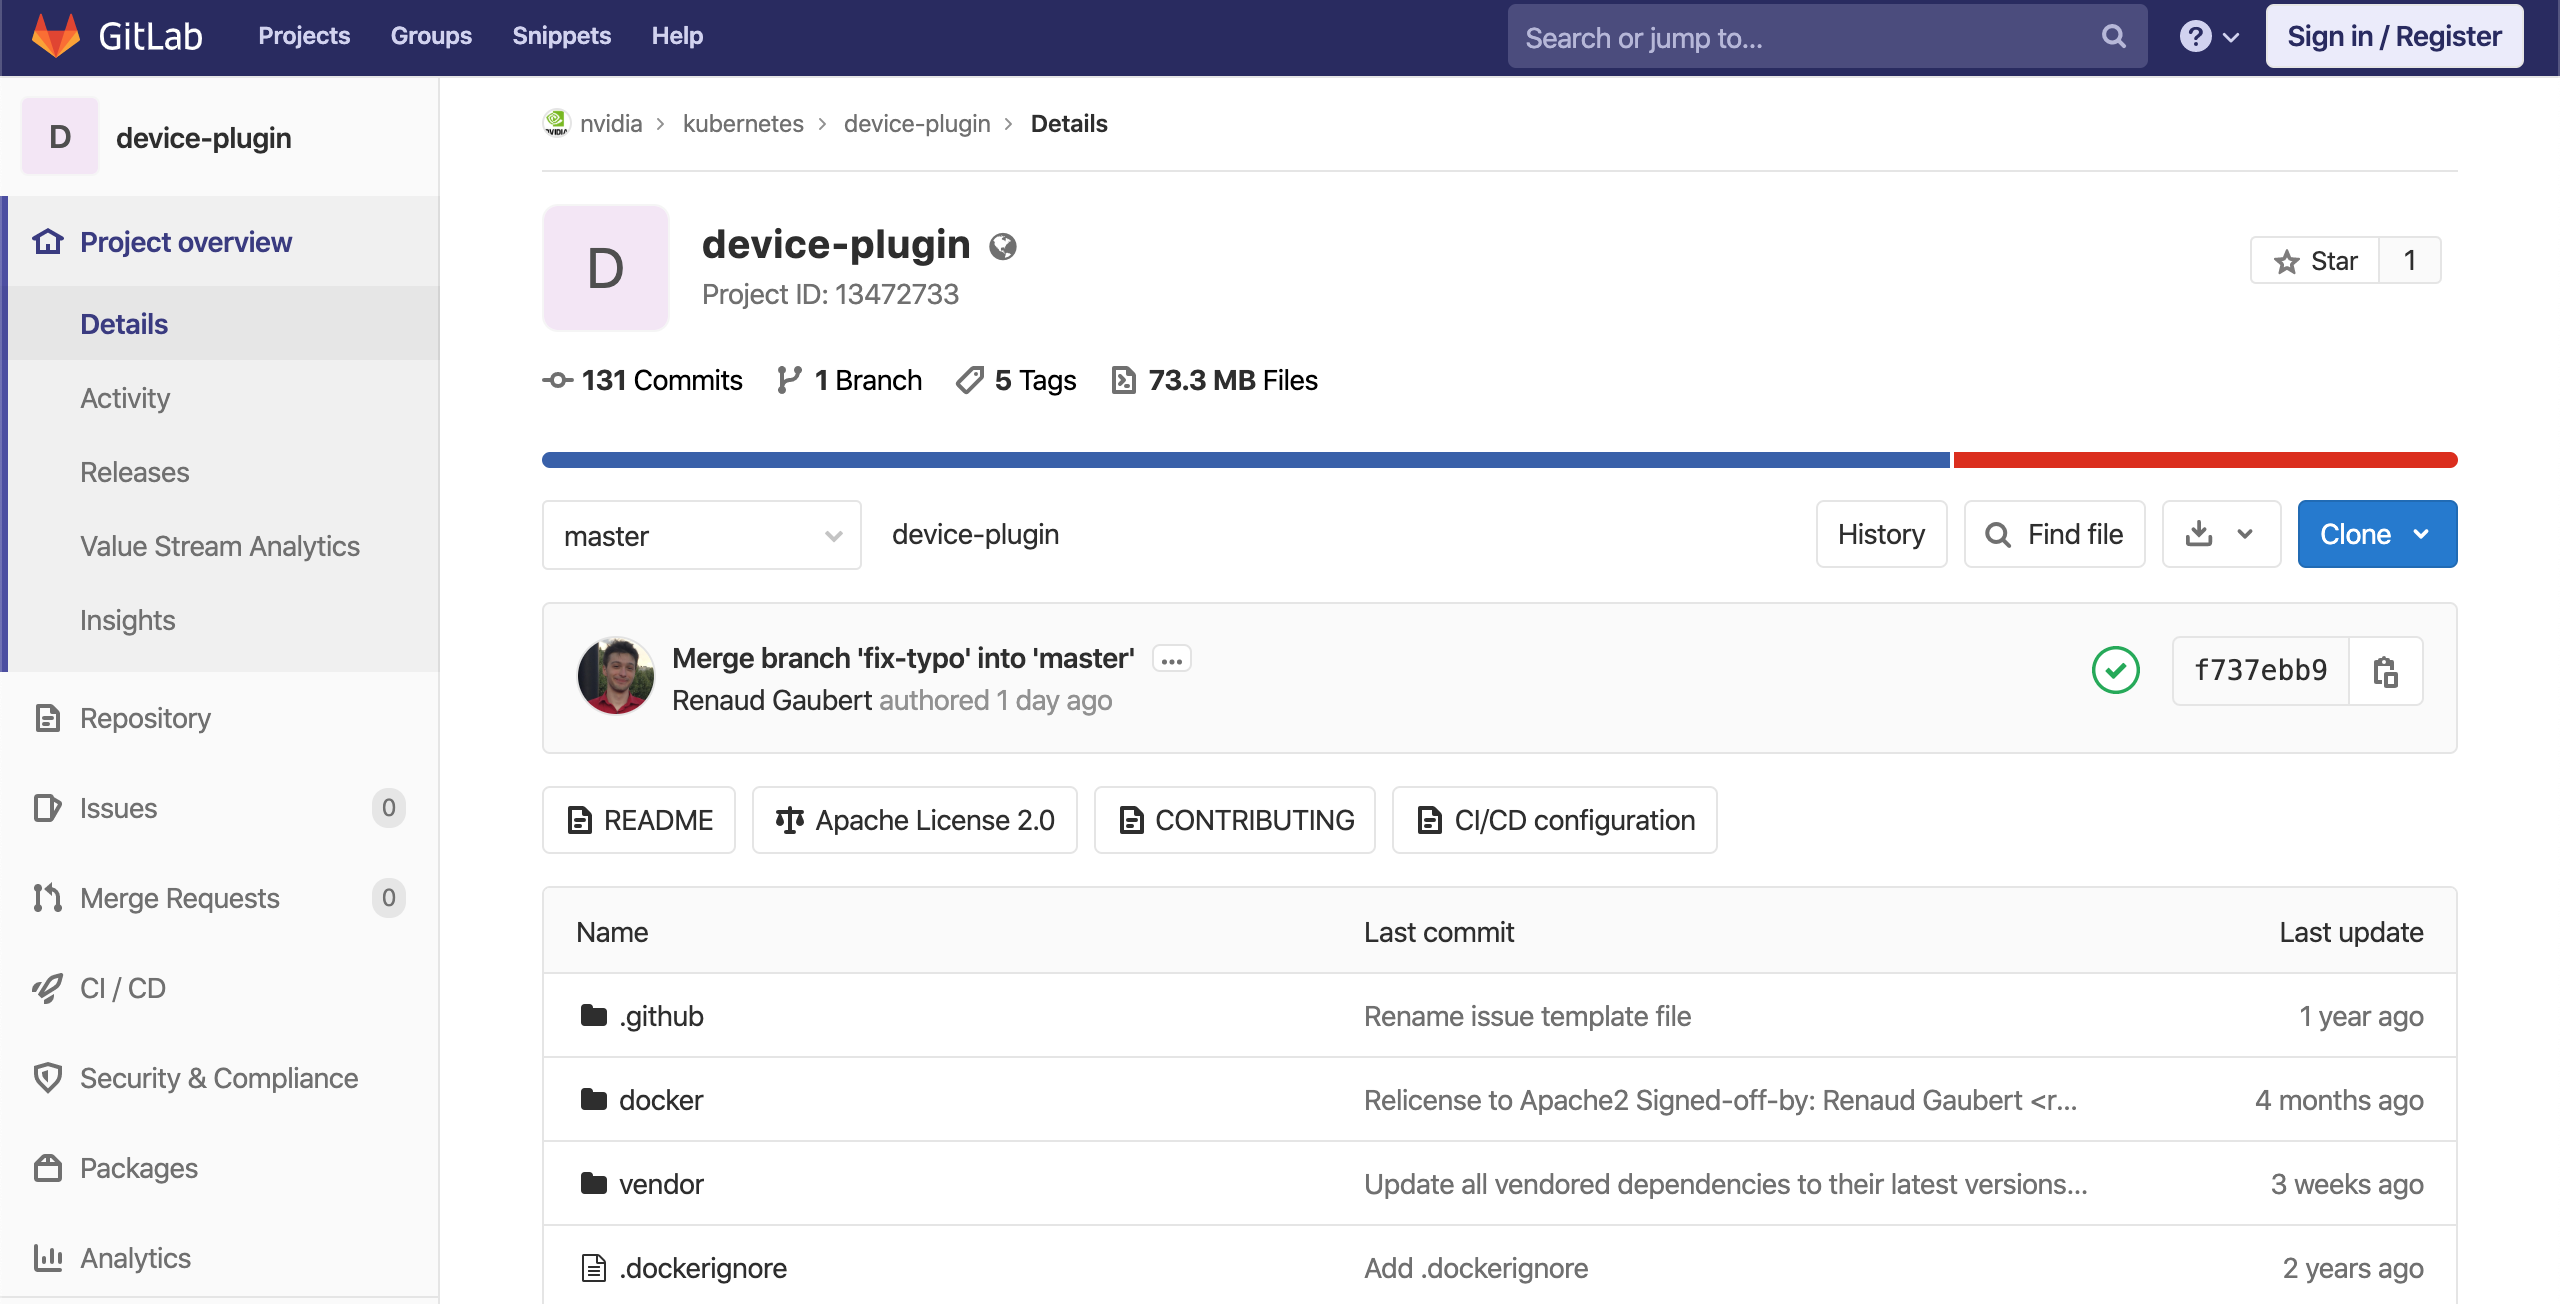
처음에 로그인하지 않고 프로젝트 화면을 봤을 때는 fork 버튼이 없어서 당황했었다.
where is fork button?
gitlab은 시스템이 다른건가…? 항상 member로만 속해있다가 다른 프로젝트에 contribute하는 건 처음이라…
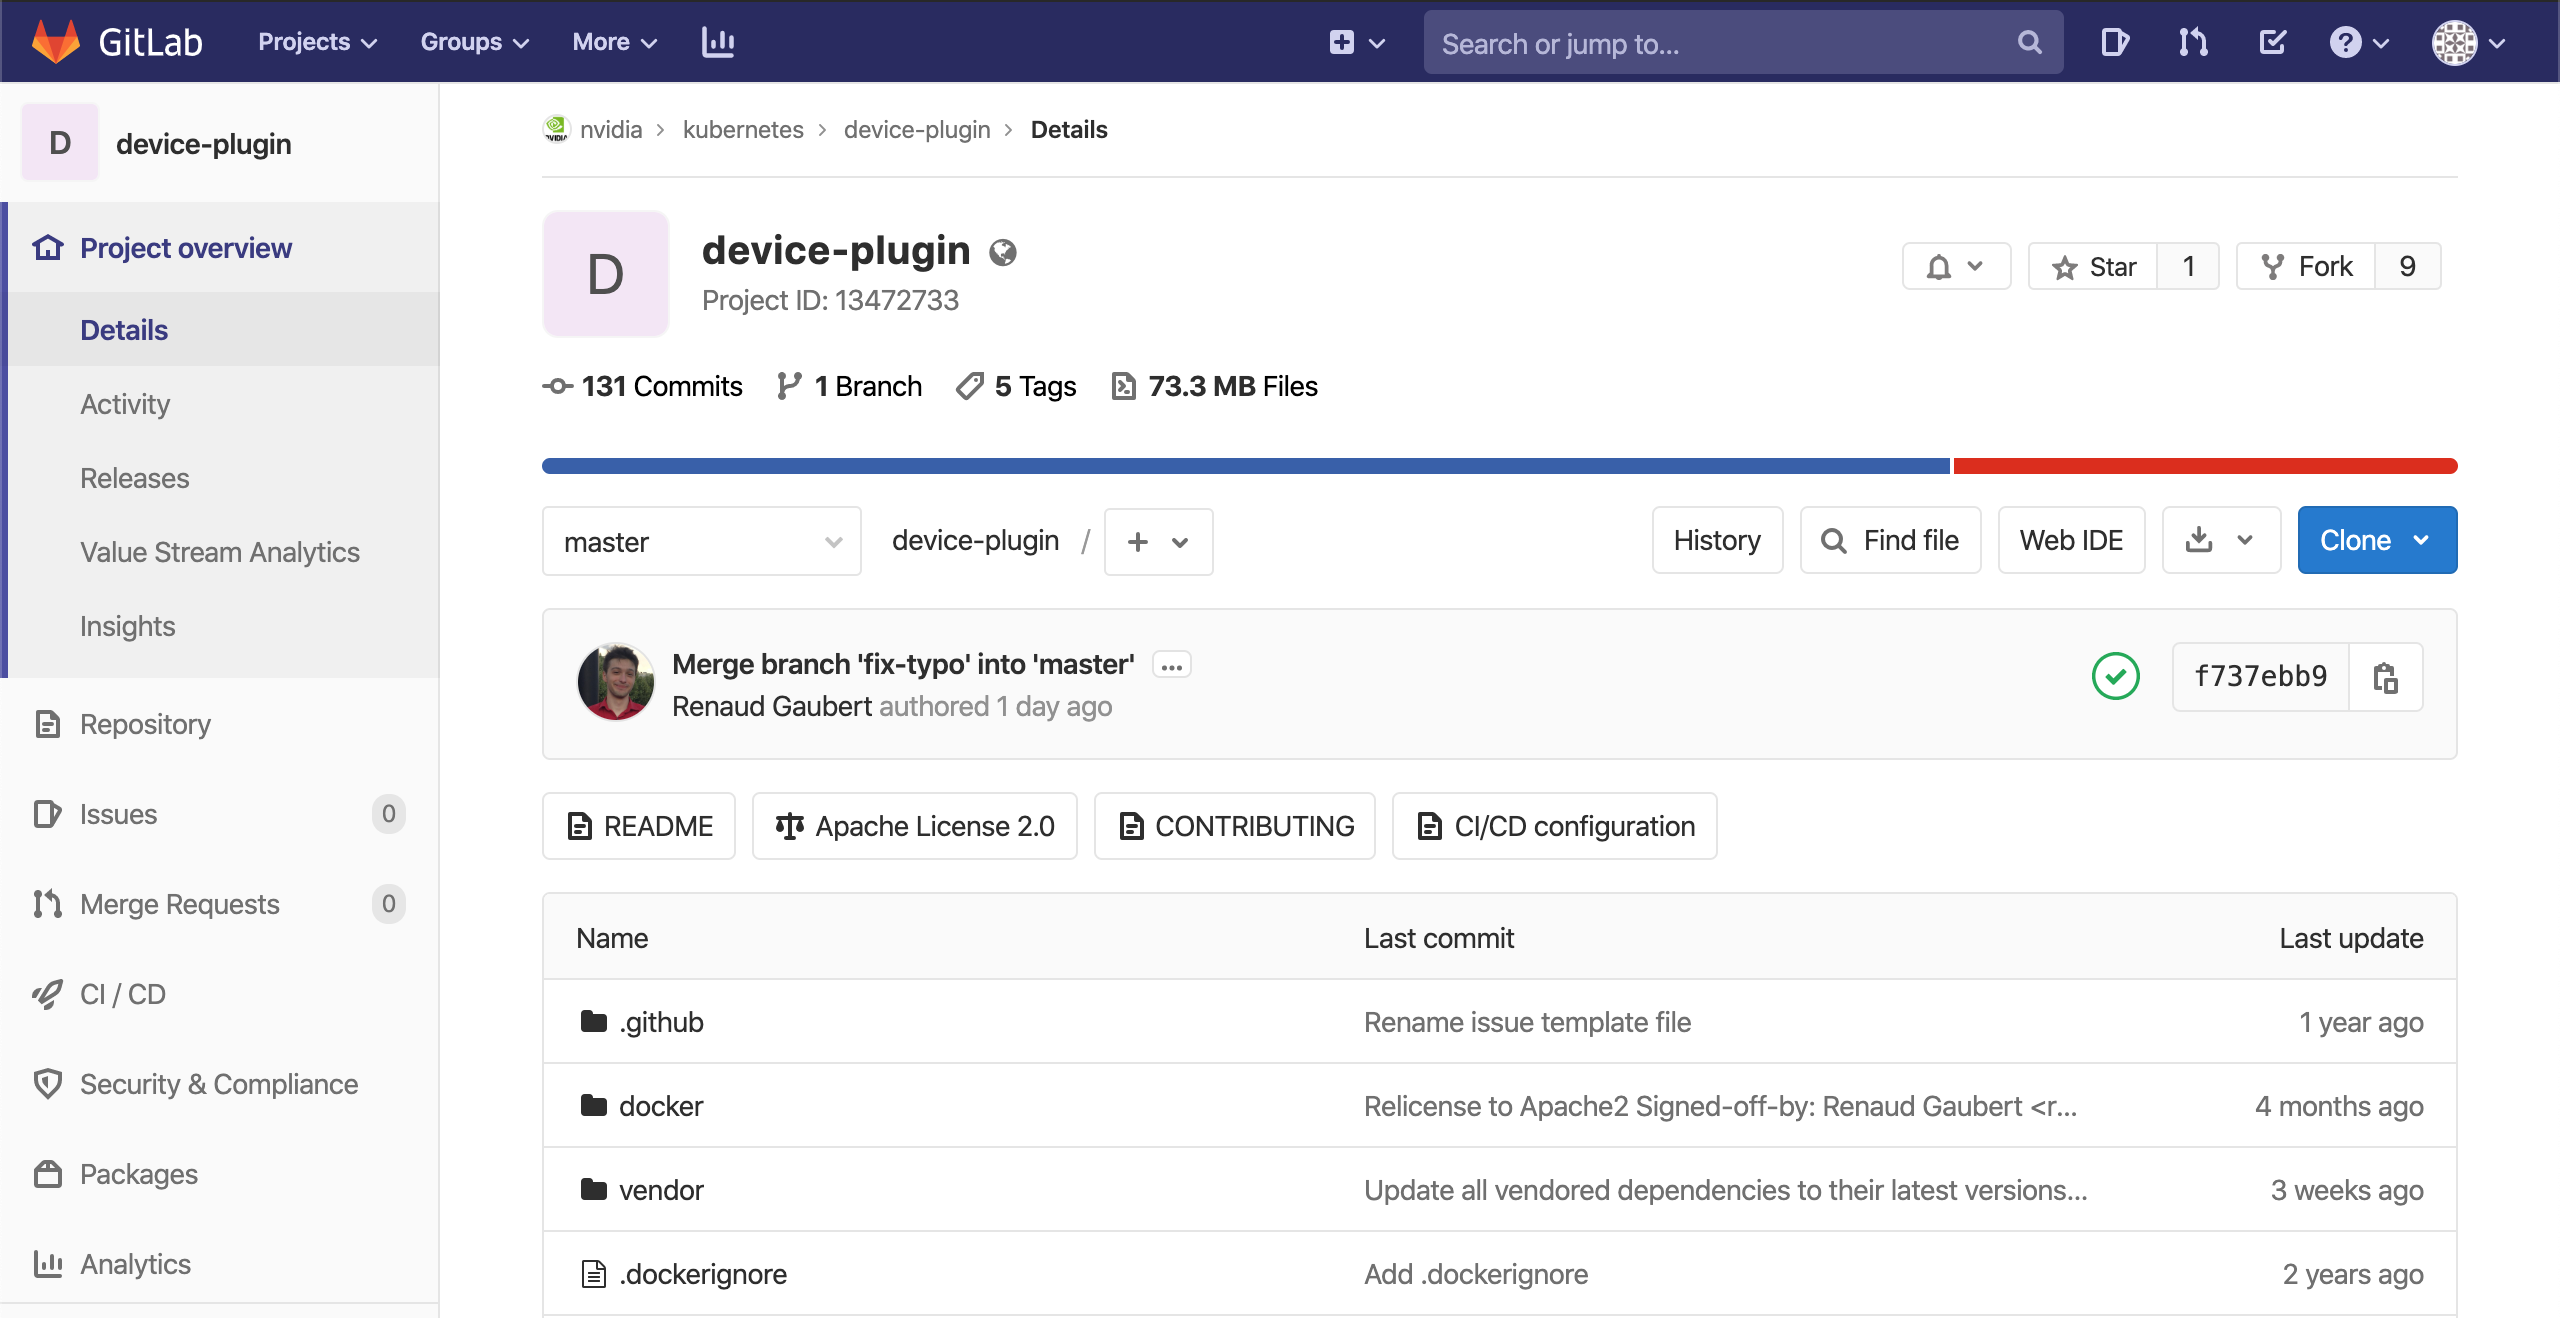
많은 걱정 속에, 일단 gitlab 가입을 하고 로그인을 했더니 바로 fork 버튼이 나타나더라.
fork button appeared after login
1차 시도 때했던 작업을 동일하게 한 뒤, MR(Merge Request, gitlab에서는 PR이 아니라 MR)을 올렸다.

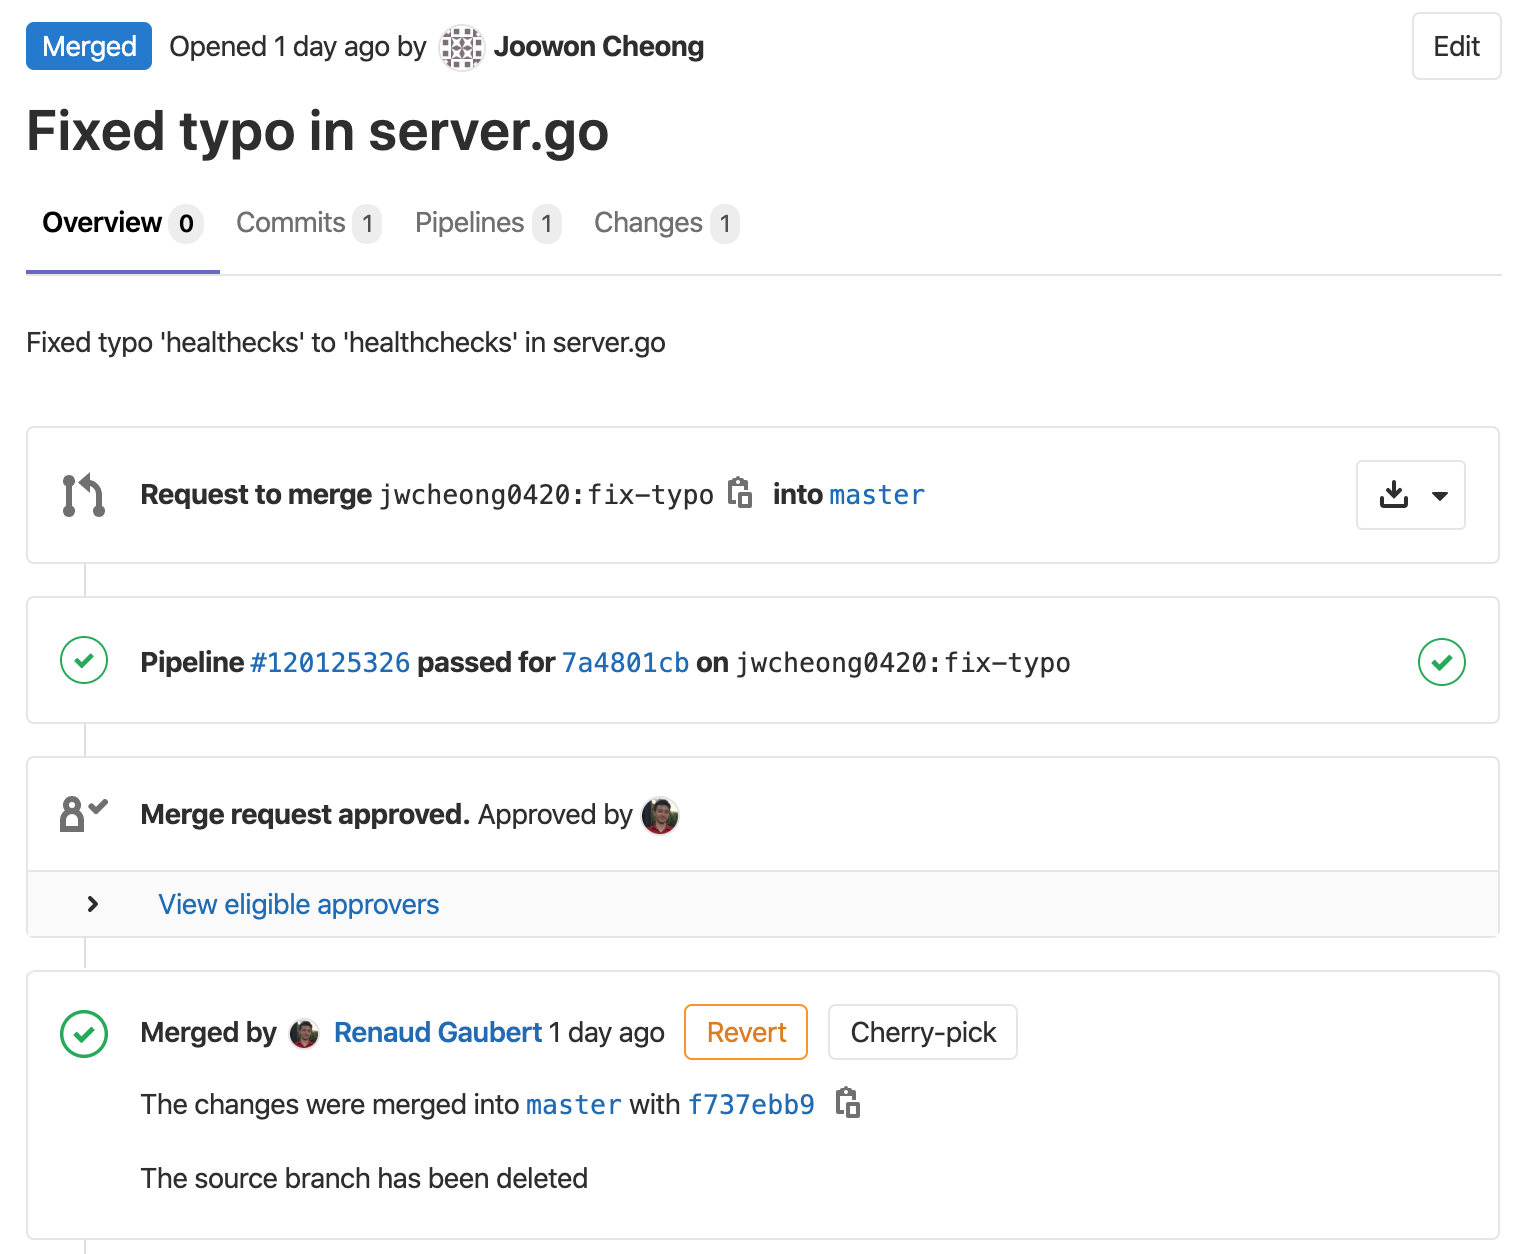
Merged!

또 30분 정도 뒤에 메일이 왔는데 이번엔 Closed가 아니라 Merged 되었다는 메일이었다:)
merge request

mirror된 github에서도 한번 확인

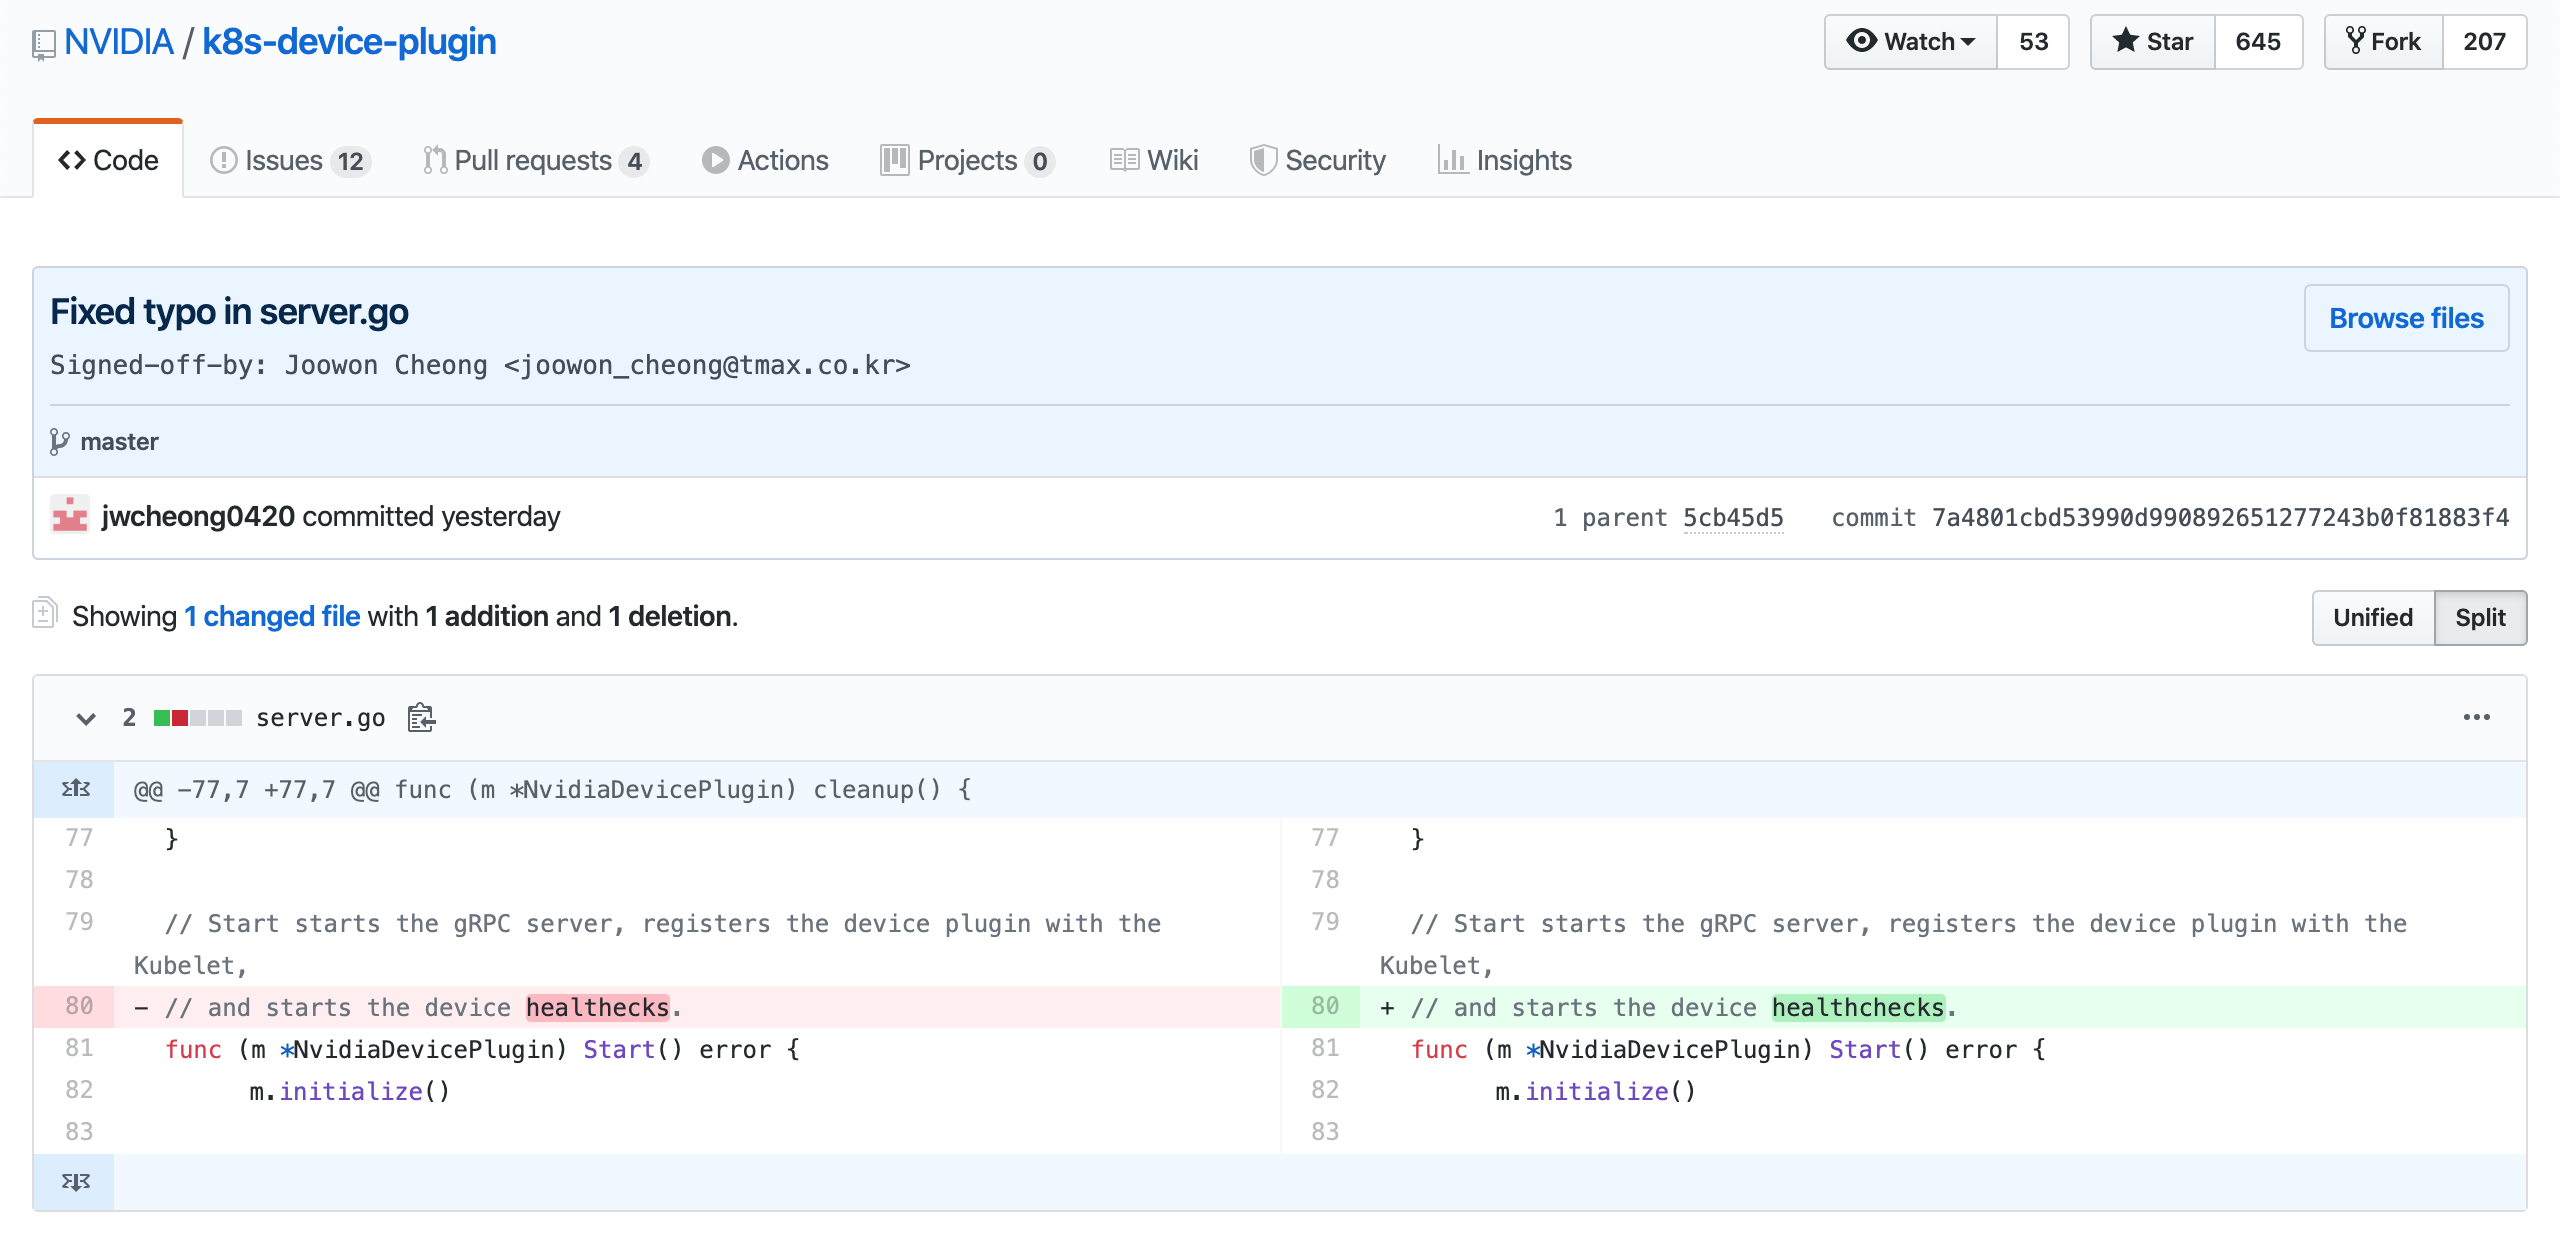
github에서는 내 commit이 어떻게 보일까 궁금해서 다시 한 번 확인해보았다.
아이디가 같아서인지, 저 아이디의 아이콘을 클릭하면 내 github 페이지로 이동하더라.
commit at github

이제 내가 고친 파일의 contributor 목록에 내가 보인다(흐-뭇)
contributors

후기

오타를 발견하고 컨트리뷰트하기까지 약 반나절이 걸렸다.
너무나도 신선한 경험이었고, 토요일 아침에 발견해서 그런지 이번 주말은 뿌듯한 마음으로 잘 쉬었다.(응?)
역시 마음 조급해할 것 없이, 내가 할 일을 하면 되는구나 싶기도 하고…
큰 오픈소스 프로젝트도 아니고 별 거 아닌 오타 수정일 뿐이지만, 높아만 보였던 오픈소스 컨트리뷰트의 문턱을 넘어서 기쁘다.
그런데 아직도 의문인건 request를 보내면 30분 안에 답이 오는 저 열일하시는 분… 역시 nvidia인건가? 멋져…

proc file system과 sysctl command, ipc namespace 분리 테스트까지

proc file system과 sysctl command

proc file system

proc file system이란

  • Unix 계열 OS에서 프로세스와 다른 시스템 정보를 계층적인 파일 구조 같은 형식으로 보여주는 pseudo filesystem
  • 부트 타임에 /proc이라는 마운트 포인트에 매핑
  • 커널에서 내부 데이터 구조체에 대한 인터페이스처럼 행동
    • 커널 영역과 사용자 영역 사이의 통신에 대한 방식 제공
  • 런타임(sysctl) 시에 특정한 커널 파라미터를 바꾸고 시스템에 대한 정보를 얻는데 사용될 수 있음

/proc 하위 구조

  • /proc/{PID}
    • (커널 프로세스를 포함하는) 실행 중인 프로세스 별로 디렉토리가 존재
  • /proc/crypto
    • 사용 가능한 암호화 모듈들에 대한 목록
  • /proc/devices
    • 장치 ID에 의해 정렬된 캐릭터와 블록 장치 뿐 아니라 /dev 이름에 대한 목록
  • /proc/filesystems
    • 리스팅 시의 커널에 의해 지원되는 파일 시스템들의 목록
  • /proc/sys
    • 동적으로 설정 가능한 커널 옵션들에 대한 인터페이스
  • (생략)

왜 proc file system을 사용하는가?

  • 파일 시스템 오버 헤드를 줄일 수 있음
    • 일반적인 파일시스템은 오버헤드가 많다
      • 각 파일의 inode, superblocks와 같은 객체를 관리해야 함
      • 이런 정보를 필요할 때마다 OS에 요청해야 함
      • 이런 정보들은 서로 어긋날 수도 있고, 단편화 현상이 발생할 수도 있음
    • procfs은 리눅스 커널에서 직접 파일시스템을 관리하는 방법을 채택
    • procfs은 커널메모리에서 돌아가는 가상 파일 시스템
  • 물리적인 파일시스템 장치를 필요로 하지 않음
    • 커널 메모리에서 유지하는 파일 시스템
  • 최적화된 파일 작업 수행
    • proc 하위 파일들은 고정적이고 처리해야할 데이터 양이 적으므로, open/read/write/close 등을 사용하여 데이터를 다루는 것이 비효율적

proc 프로그래밍

user와 데이터 교환법
  • procfs의 데이터는 파일에 저장되는 것이 아니라 커널 메모리에 저장하며, 커널 메모리는 유저레벨에서 직접 접근 불가능
    • user가 cat(혹은 read 함수)를 통해 파일의 내용을 읽으려하면, 커널에서 데이터를 유저에게 일정한 포맷으로 뿌려줌
    • user가 어떤 내용을 proc 파일에 쓰게되면 데이터를 받아들이고 가공해서 커널 메모리에 로드
  • kernel와 user 사이에 데이터를 전달해주는 callback 함수를 등록시켜서 사용
    1
    2
    3
    4
    5
    # proc_dir_entry에 read/write를 위한 callback 함수를 등록
    struct proc_dir_entry *entry;

    entry->read_proc = read_proc_foo;
    entry->write_proc = write_proc_foo;

proc file system 소스 코드

sysctl command

  • 동작
    • 동적으로 커널 파라미터를 설정
    • /proc/sys 하위에 있는 파라미터만 가능
  • 사용법
    • sysctl -w {param}=”{value}”
      • 일시적으로 해당 파라미터를 설정
      • 재부팅 시 유지되지 않음
    • sysctl -p{file_path}
      • file_path로부터 sysctl 설정을 로드
      • file_path가 주어지지 않으면 /etc/sysctl.conf을 로드
  • 참고
    • 부팅 시점에 /proc mount 후 sysctl에 의해 /etc/sysctl.conf가 자동으로 로드됨

K8S에서의 sysctl 설정 방법

  • K8S에서 커널 파라미터 변경을 위해 sysctls spec을 설정할 수 있음
  • sysctls
    • safe와 unsafe 파라미터를 구분하여 관리
    • safe 파라미터는 default로 enable
      • kernel.shm_rmid_forced
      • net.ipv4.ip_local_port_range
      • net.ipv4.tcp_syncookies
    • unsafe 파라미터는 cluster admin을 통해 node별로 enable해야 함
      • disabled unsafe sysctls를 사용한 pod은 스케줄링까지는 되지만, launch는 실패
  • unsafe sysctls를 enable하는 방법
    • node별로 kubelet에 다음과 같은 설정을 추가하여 기동
      1
      kubelet --allowed-unsafe-sysctls ‘{원하는 kernel 파라미터}’ ...

테스트

테스트 환경

test한 cluster 정보

테스트 과정

  • enable되지 않은 unsafe 파라미터를 수정하는 pod deploy

    1
    2
    3
    4
    5
    6
    7
    8
    9
    10
    11
    12
    13
    14
    15
    apiVersion: v1
    kind: Pod
    metadata:
    name: joo-modify-sysctl
    spec:
    securityContext:
    sysctls:
    - name: kernel.sem
    value: "10000 1024000000 500 32000"
    containers:
    - name: nginx
    image: nginx
    ports:
    - containerPort: 80
    name: http
    1
    2
    root@K8S-3-1:~/joo$ k apply -f sysctl_test.yaml
    pod/joo-modify-sysctl created

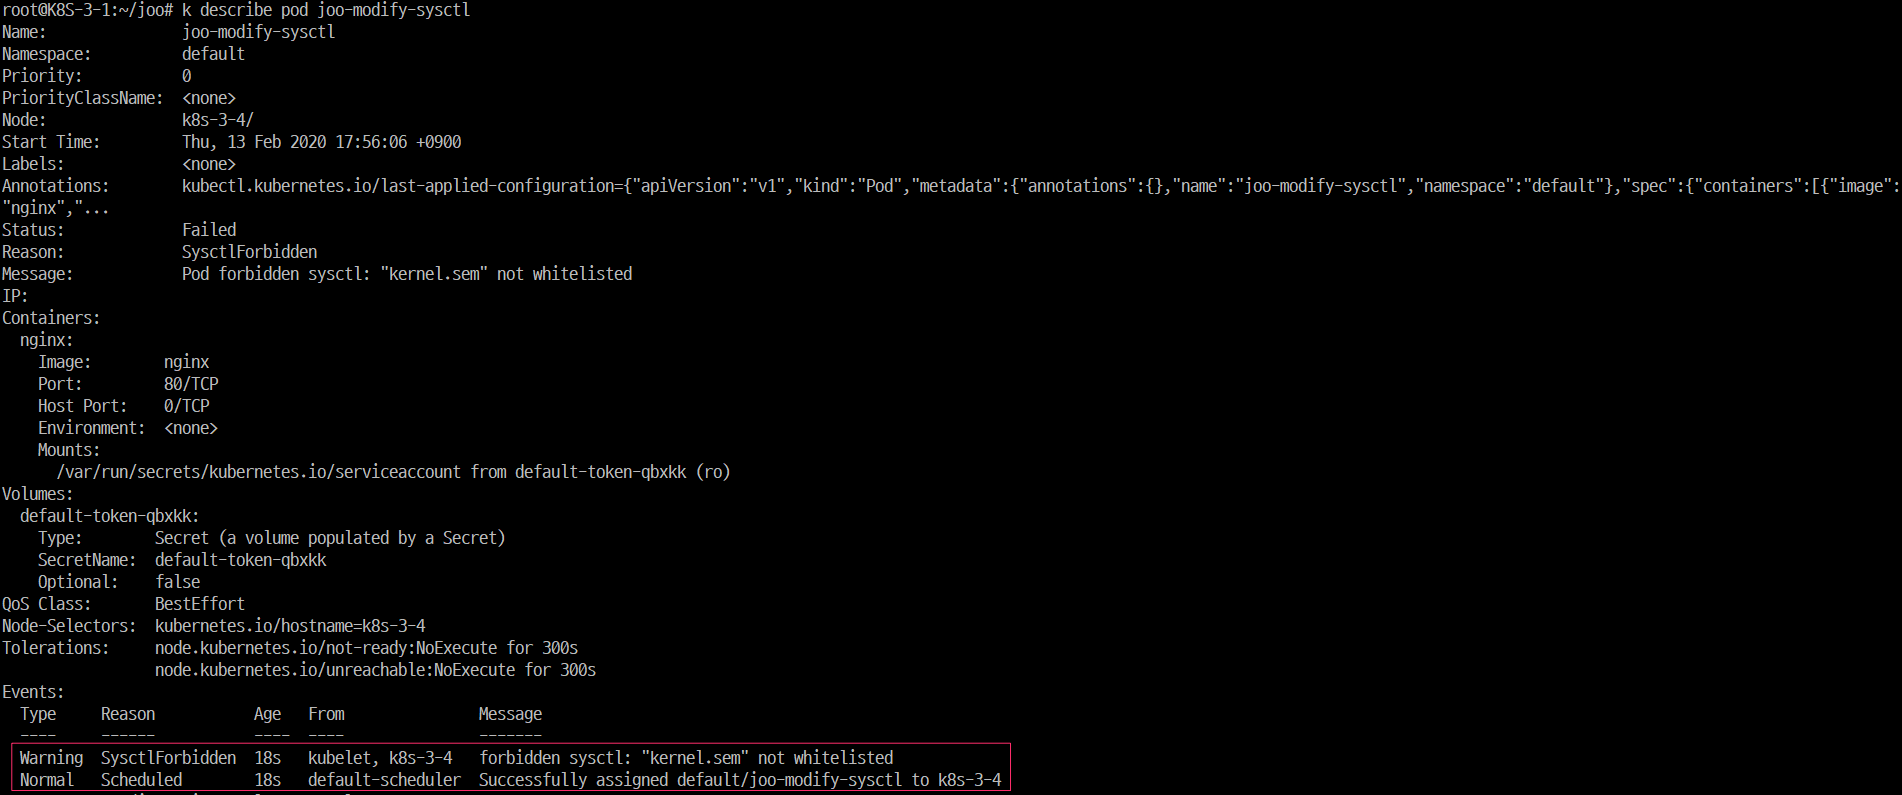
    sysctl 변경 실패 - SysctlForbidden
    sysctl 변경 실패 - SysctlForbidden

  • kubelet config에 sysctl unsafe parameter 활성화

    • kubelet 설정에 –allowed-unsafe-sysctls ‘kernel.sem’ 추가
      1
      root@K8S-3-5:~$ vi /etc/systemd/system/kubelet.service.d/10-kubeadm.conf
      1
      2
      3
      4
      5
      6
      7
      8
      9
      10
      11
      12
      # Note: This dropin only works with kubeadm and kubelet v1.11+
      [Service]
      Environment="KUBELET_KUBECONFIG_ARGS=--bootstrap-kubeconfig=/etc/kubernetes/bootstrap-kubelet.conf --kubeconfig=/etc/kubernetes/kubelet.conf"
      Environment="KUBELET_CONFIG_ARGS=--config=/var/lib/kubelet/config.yaml"
      Environment="KUBELET_EXTRA_ARGS=--feature-gates=DevicePlugins=true --allowed-unsafe-sysctls 'kernel.sem'"
      # This is a file that "kubeadm init" and "kubeadm join" generates at runtime, populating the KUBELET_KUBEADM_ARGS variable dynamically
      EnvironmentFile=-/var/lib/kubelet/kubeadm-flags.env
      # This is a file that the user can use for overrides of the kubelet args as a last resort. Preferably, the user should use
      # the .NodeRegistration.KubeletExtraArgs object in the configuration files instead. KUBELET_EXTRA_ARGS should be sourced from this file.
      EnvironmentFile=-/etc/default/kubelet
      ExecStart=
      ExecStart=/usr/bin/kubelet $KUBELET_KUBECONFIG_ARGS $KUBELET_CONFIG_ARGS $KUBELET_KUBEADM_ARGS $KUBELET_EXTRA_ARGS
    • 설정 reload
      1
      root@K8S-3-5:~$ systemctl daemon-reload
    • kubelet restart
      1
      root@K8S-3-5:~$ systemctl restart kubelet
  • pod 다시 deploy

    • deploy 성공
      1
      2
      3
      root@K8S-3-1:~/joo$ k get pods -o wide
      NAME READY STATUS RESTARTS AGE IP NODE NOMINATED NODE READINESS GATES
      joo-modify-sysctl 0/1 ContainerCreating 0 2s <none> k8s-3-5 <none> <none>
    • kernel.sem 비교
      1
      2
      3
      4
      5
      root@K8S-3-1:~$ cat /proc/sys/kernel/sem
      32000 1024000000 500 32000
      root@K8S-3-1:~$ k exec -it joo-modify-sysctl /bin/bash
      root@joo-modify-sysctl:/$ cat /proc/sys/kernel/sem
      10000 1024000000 500 32000

kernel.sem 기본값 확인

IPC namespace 분리 시 kernel.sem 값 확인

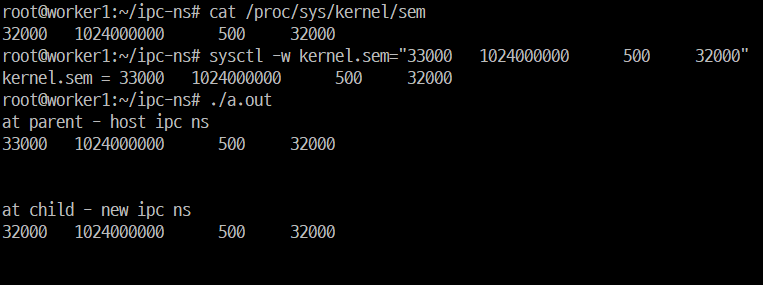
kernel.sem parameter는 IPC namespace가 분리되면 host와 다른 값(default 값)을 가짐
parameter별로 어떤 namespace에 의해 분리되는지는 다름

테스트 과정

  • default kernel.sem 확인
    • cat /proc/sys/kernel/sem
  • sysctl로 kernel.sem 변경
    • sysctl -w kernel.sem=”33000 1024000000 500 32000”
  • host ipc namespace에서의 kernel.sem을 출력하고, 새로운 ipc ns를 갖는 자식 process를 생성하여 kernel.sem을 출력하는 프로그램 실행
    ipc namespace 분리 시 kernel.sem 값 확인
  • a.out 소스
    1
    2
    3
    4
    5
    6
    7
    8
    9
    10
    11
    12
    13
    14
    15
    16
    17
    18
    19
    20
    21
    22
    23
    24
    25
    26
    27
    28
    29
    #define _GNU_SOURCE
    #include <stdio.h>
    #include <stdlib.h>
    #include <sched.h>
    #include <signal.h>
    #include <sys/types.h>
    #include <sys/wait.h>

    static char child_stack[1048576];

    static int child_fn() {
    printf("at child - new ipc ns\n");
    system("cat /proc/sys/kernel/sem");
    printf("\n\n");
    return 0;
    }

    int main() {
    printf("at parent - host ipc ns\n");
    system("cat /proc/sys/kernel/sem");
    printf("\n\n");


    pid_t child_pid = clone(child_fn, child_stack+1048576, CLONE_NEWIPC | SIGCHLD, NULL);


    waitpid(child_pid, NULL, 0);
    return 0;
    }

참고 링크

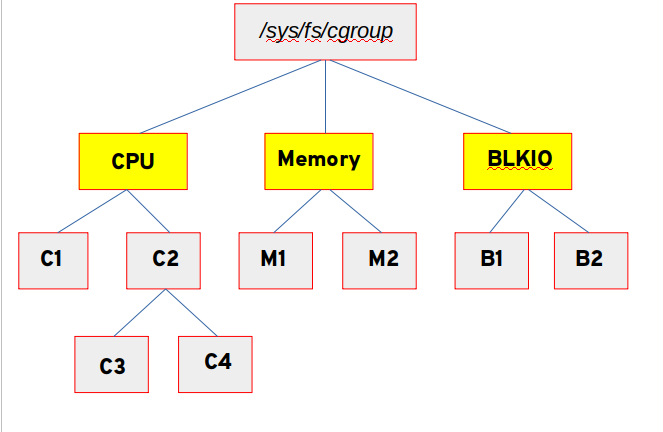
cgroup v2에 포커싱을 맞춰서 조사해보았다

cgroup이란

  • process를 계층적인 group으로 구성해서, resource 사용을 제한하고 모니터링할 수 있는 linux kernel feature
  • cgroup의 interface는 cgroupfs이라 불리는 pseudo-filesystem을 통해 제공됨
    • cgroupfs의 subdirectory를 생성/삭제/변경하면서 정의됨

구조

  • core
    • process를 계층적으로 관리
  • subsystem(== resource controller == controller)
    • resource tracking과 제한
    • cgroup에 속한 process의 행동을 변경함
      • resource 제한이나 모니터링을 하면서 process를 freeze시키거나 resume(다시 시작)하는 등

사용법

mounting

  • v1
    • controller별로 mount하여 사용 가능
      1
      2
      3
      mount -t tmpfs cgroup_root /sys/fs/cgroup
      mkdir /sys/fs/cgroup/cpuset
      mount -t cgroup cpuset -ocpuset /sys/fs/cgroup/cpuset
      cgroup hierarchy v1
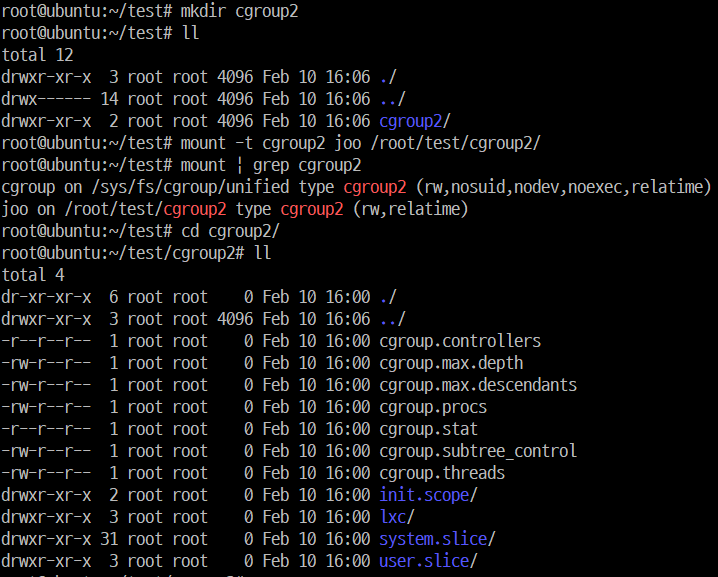
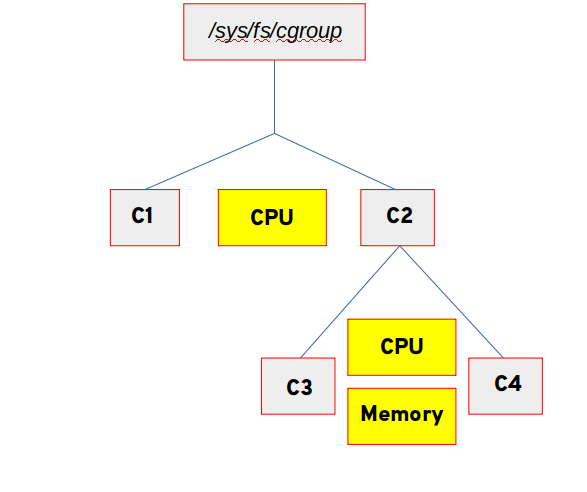
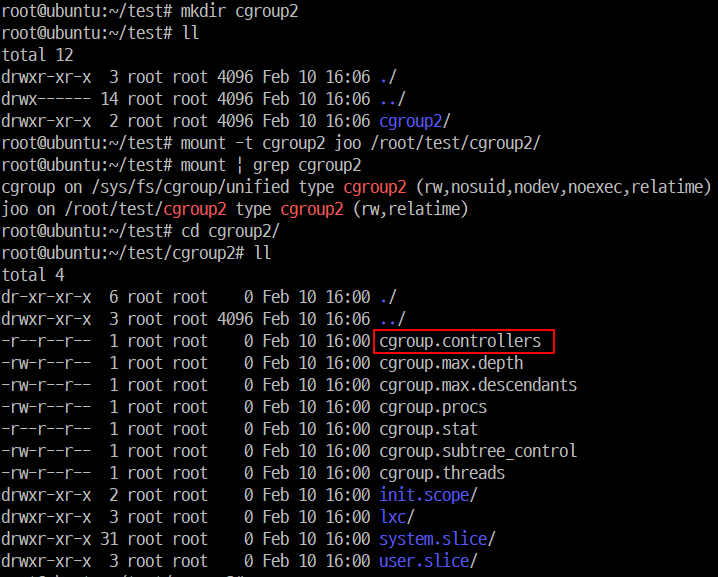
  • v2
    • unified cgroup hierarchy
      1
      mount -t cgroup2 none $MOUNT_POINT
      cgroup mounting example v2
      cgroup hierarchy v2

subtree control(cgroup2) -> 아직 잘 모르겠다

  • cgroup.controllers
    • read-only file
    • 해당 cgroup에 available한 controller의 list를 노출
    • 부모 cgroup의 cgroup.subtreee_control과 내용이 동일함???
  • cgroup.subtree_control
    • 해당 cgroup에 활성화되어있는 controller 목록
    • 해당 cgroup의 cgroup.controllers에 있는 subset????
    • 이 파일에 +, -로 controller들을 활성화, 비활성화 가능
      1
      echo '+pids -memory' > x/y/cgroup.subtree_control
      • cgroup.controllers에 없는 controller를 enable시키려하면 ENOENT 에러 발생
        1
        2
        3
        cat cgroup.controllers        # 사용 가능한 controller 없음 확인
        echo "-io" > cgroup.subtree_control # 문제 없음
        echo "+io" > cgroup.subtree_control # cgroup.controllers에 없으므로 에러 발생
        subtree control example

thread mode (cgroup2)

  • Linux 4.14에 추가
    • cpu와 같은 몇몇 controller들은 thread-level granularity 제어가 유용하기 때문
  • root가 아닌 cgroup은 cgroup.type 파일이 있음
    • type value
      • domain(default)
        • nomal v2 cgroup
        • process-granularity
      • threaded
        • threaded subtree의 멤버 cgroup
        • process가 추가될 수 있고 controller가 활성화될 수 있음
      • domain threaded
        • threaded subtree의 root처럼 여겨지는 domain cgroup
      • domain invalid
        • threaded subtree 안에 있는 invalid 상태인 cgroup
        • process가 추가될 수 없고 controller도 활성화될 수 없음
        • 할 수 있는 단 한 가지 일은 이 cgroup을 threaded cgroup으로 바꾸는 것 뿐
  • threaded controllers / domain controllers
    • threaded controllers
      • cpu, perf_event, pids
    • domain controllers
      • threaded subtree에서는 활성화될 수 없음

deprecated v1 core features

  1. Multiple hierarchies including named ones are not supported.

    • 같은 계층에 여러 controller를 mount할 수 있었음
    • named hierarchies
      • controller가 attach되지 않은 cgroup 계층도 mount 가능했었음
      • 각 계층은 unique한 이름을 가져야 함
        1
        mount -t cgroup -o none,name=somename none /some/mount/point
  2. All v1 mount options are not supported.

    • v1의 경우, 원래는 controller별로 mount가 가능했을 뿐 아니라 모든 controller를 mount 하는 기능이 있었음
      1
      mount -t cgroup xxx /sys/fs/cgroup  # xxx는 cgroup과는 관계가 없고 /proc/mounts에 나타날 내용이므로 마음대로 유용하고 식별 가능한 이름을 사용하면 됨
  3. The “tasks” file is removed and “cgroup.procs” is not sorted.

    • v1
      • tasks에 pid를 관리하고 cgroup.procs라는 파일에 tgid를 관리했었음
        tasks in cgroup v1
      • cgroup.procs는 tgid를 정렬하고 중복제거 했었음
        cgroup.procs in cgroup v1
    • v2
      • croups.procs에 pid를 관리하고, 중복제거 및 정렬되지 않음
  4. “cgroup.clone_children” is removed.

    • cpuset controller에만 영향을 미치는 flag
    • 1로 활성화되어있으면, 새로운 cpuset cgroup이 초기화하는 동안 부모로부터 설정을 복사했었음
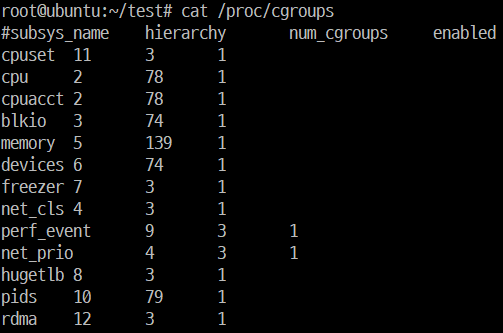
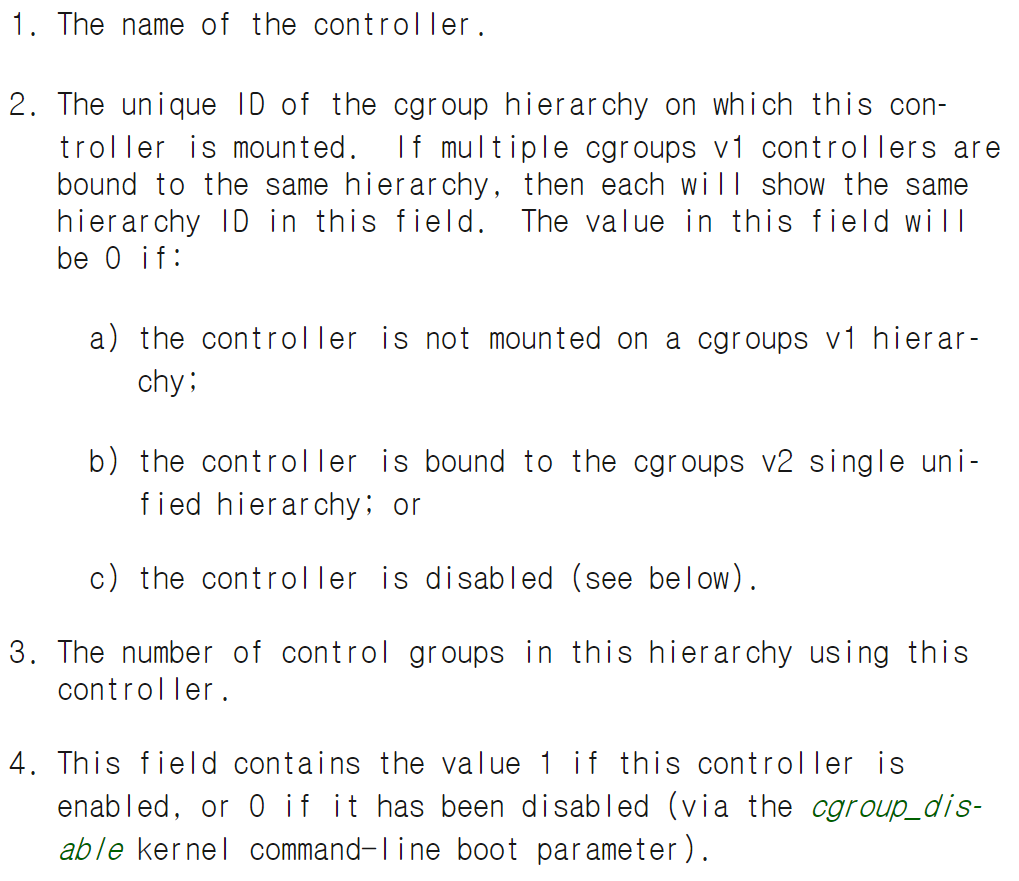
  5. /proc/cgroups is meaningless for v2. Use “cgroup.controllers” file at the root instead.

    • v1
      • /proc/cgroups에 kernel에 compile되어 들어간 controller에 대한 정보를 담고 있음
        /proc/cgroups in v1
        /proc/cgroups values
    • v2
      • cgroup2는 controller별로 mount하는 것이 아니기 때문에, 한 계층에 여러 controller가 mount되어있는지 여부를 관리할 필요가 없기 때문에 없어진 것 같음
        cgroup.controllers

v1에서의 이슈(v2의 근거)

  1. Multiple Hierarchies

    • 문제점 @v1
      • v1은 임의의 계층을 만들 수 있고, 각 계층에 몇 개의 controller가 mount되어도 상관없었음. 이것은 flexibility를 보장하는 것 같았지만, 실상은 유용하지 않았음
        • cpu, cpuacct와 같은 밀접하게 관련된 것들만 같은 계층에 mount되어 사용됨
        • 결국 사용자가 각 계층마다 비슷한 계층구조를 반복해서 만들게 됨
      • 이에 대한 core 구현이 너무 복잡하여 비용이 큼
      • 계층이 몇개가 되던 limit이 없었음
      • 다른 controller의 토폴로지를 예상할 수 없었기 때문에, 각 controller는 다른 모든 controller가 완전히 직교 계층 구조에 연결되어있다고 생각해야 함
        • 일반적으로 요구되는 것은, 특정 controller에 따라 다른 수준의 granularity(세분성)을 갖는 것
          • ex) 특정 레벨 전까지는 memory는 관리 안하고, CPU 관리는 하길 바라는 등
    • 개선 @v2
      • 모든 controller가 하나의 계층에 mount됨
      • subtree control로 controller 관리
  2. Thread Granularity

    • 문제점 @v1
      • v1은 thread가 다른 cgroup에 속할 수 있었음
        • 몇몇 controller와는 사상이 맞지 않음
          • ex) 하나의 process에 있는 thread들은 memory를 공유하므로 다른 memory cgroup에 속할 수 없음
      • v1은 모호하게 정의된 delegated(위임) 모델이어서, thread granularity(세분성)이 남용됨
        • cgroup은 개별 application에 위임되어서, 자체적으로 하위 계층을 만들고 관리하고 그에 따른 리소스 분배를 제한할 수 있었음
        • cgroup은 이렇게 노출되기 때문에 근본적으로 부적절한 interface를 갖고 있음
          • /proc/self/cgroup에서 대상 계층 구조의 path를 추출
            -> knob(손잡이) 이름을 path에 추가하여 path를 구성
            -> open하여 read/write함
    • 개선 @v2
      • process granularity
        • process 단위로 cgroup에 속할 수 있음
        • 하나의 process에 속하는 모든 thread는 같은 cgroup에 속함
        • Linux 4.14의 thread mode 추가로 인해 rule이 몇몇 case에 대해서 완화됨
  3. Other Interface Issues -> 잘 모르겠다

    • core에서 empty cgroup에 알림을 보내는 것 관련하여 event 전달 매커니즘이 이상함
    • controller 역시 계층적 조직을 완전히 무시하고 모든 cgroup을 마치 root cgroup 바로 아래에 있는 것처럼 취급하여 문제가 많음
  4. Controller Issues and Remedies

    • Memory
      • soft limit / hard limit 관련 이슈 개선

왜 cgroup v2로 빨리 migrate할 수 없는가?

  • device controller와 freezer에 대한 지원이 없어서 container한테 유용하지 않았음
    • device controller가 없어서 container 안의 root user가 device file에 바로 접근할 수 있음
    • container를 freeze할 수 없어서 TOCTOU 공격에 예방하지 못함
    • 4.15 (2018/01)에 device controller 지원
    • 5.2에 freezer 지원
  • v1과 v2은 호환되지 않기 때문에, v1에서 v2로 migrate하는 것이 어려움
    • v1과 v2를 혼합해서 사용하는 hybird 옵션이 있긴 하지만, 이미 v1에 활성화되어있는 controller를 v2에 활성화시키지 못하므로 container에 잘 사용되지 않음

cgroup2 사용처

참고 링크

kubernetes는 swap을 사용하지 않는 것을 권장한다

  • 이러한 이유들 때문인데…
    • 요약하자면, QoS 개념과 상충될 뿐더러 swap을 지원하려면 고려해야할 게 많으므로 당장은 생각하지 않겠다는 입장

그럼에도 불구하고 swap을 써보겠다면…

  • 테스트한 kubernetes 버전
    1
    kubectl get nodes
    테스트 환경

kubernetes 구성할 때 swap을 무시해보자

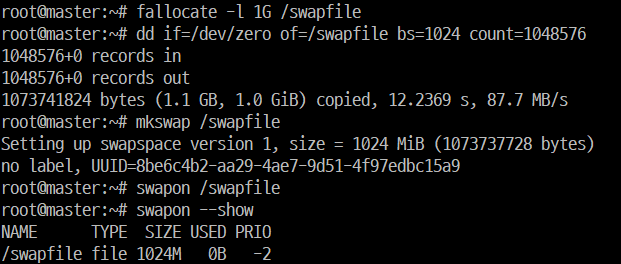
  • swap 파티션 만들고 켜기
    1
    2
    3
    4
    5
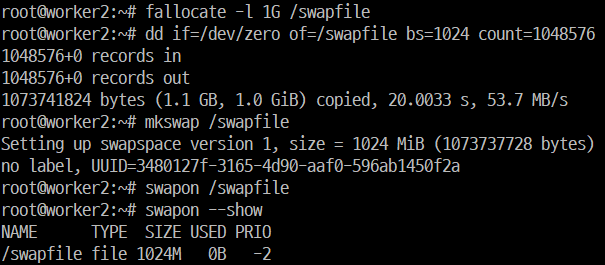
    fallocate -l 1G /swapfile
    dd if=/dev/zero of=/swapfile bs=1024 count=1048576
    mkswap /swapfile
    swapon /swapfile
    swapon --show
    swap 생성
  • kubelet config 변경 후 적용
    • kubeadm init 전에는 /var/lib/kubelet/config.yaml이 없다는 메세지가 출력되면서 kubelet 재기동이 되지 않는다.
      kubeadm init할 때 어차피 kubelet 기동하는 단계가 있으므로 일단 config 적용까지만 한다.
      1
      2
      sed -i '9s/^/Environment="KUBELET_EXTRA_ARGS=--fail-swap-on=false"\n/' /etc/systemd/system/kubelet.service.d/10-kubeadm.conf
      systemctl daemon-reload
      kubelet config 변경 후 적용
  • kubeadm init 시 –ignore-preflight-errors 옵션 추가
    • 사용할 CNI에 따라 추가해야하는 옵션이 다르다. flannel을 사용하는 예시이다.
      1
      kubeadm init --pod-network-cidr=10.244.0.0/16 --ignore-preflight-errors=Swap
      kubeadm init
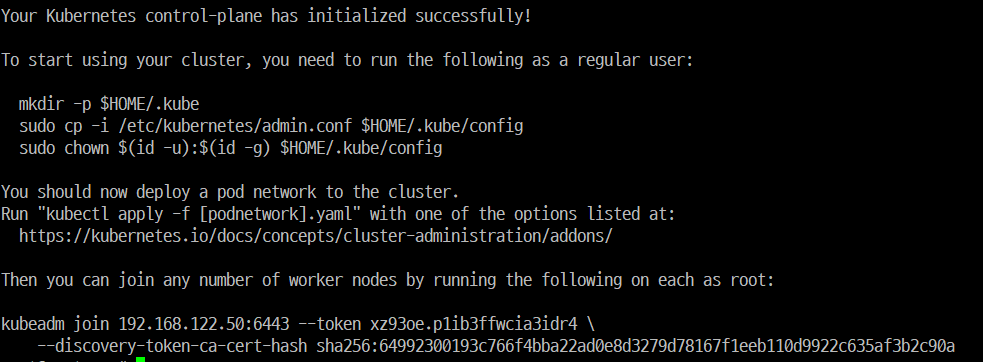
    • kube config를 복사(kubeadm init 결과를 잘 복사해둘 것)
      kubeadm init 결과
      1
      2
      3
      mkdir -p $HOME/.kube
      sudo cp -i /etc/kubernetes/admin.conf $HOME/.kube/config
      sudo chown $(id -u):$(id -g) $HOME/.kube/config
      kube config 복사
  • kubelet 상태 확인
    1
    systemctl status kubelet
    kubelet status 확인
  • worker node도 swap을 켜고 kubelet config를 바꾸기
    1
    2
    3
    4
    5
    fallocate -l 1G /swapfile
    dd if=/dev/zero of=/swapfile bs=1024 count=1048576
    mkswap /swapfile
    swapon /swapfile
    swapon --show
    swap 생성
    1
    2
    sed -i '9s/^/Environment="KUBELET_EXTRA_ARGS=--fail-swap-on=false"\n/' /etc/systemd/system/kubelet.service.d/10-kubeadm.conf
    systemctl daemon-reload
    kubelet config 변경
  • node join 시 –ignore-preflight-errors=Swap 추가
    1
    kubeadm join 192.168.122.50:6443 --token xz93oe.p1ib3ffwcia3idr4 --discovery-token-ca-cert-hash sha256:64992300193c766f4bba22ad0e8d3279d78167f1eeb110d9922c635af3b2c90a --ignore-preflight-errors=Swap
    node join

이미 구성한 kubernetes에서 swap을 켜보자

  • worker2의 kubelet 상태 확인
    1
    systemctl status kubelet
    테스트 전 worker2의 kubelet 상태
  • swapon /swapfile 후 kubelet 재기동
    1
    2
    3
    4
    swapon /swapfile
    swapon --show
    systemctl restart kubelet
    systemctl status kubelet
    swap 주고 kubelet 재기동
  • kubelet configure 파일 수정
    1
    2
    3
    sed -i '9s/^/Environment="KUBELET_EXTRA_ARGS=--fail-swap-on=false"\n/' /etc/systemd/system/kubelet.service.d/10-kubeadm.conf
    systemctl daemon-reload
    systemctl restart kubelet
    kubelet config 변경 후 재기동

kubelet에서 swap check하는 코드

  • –fail-swap-on은 default로 true
  • –fail-swap-on이 true인 경우, /proc/swaps를 읽어서 swap 여부 확인 (소스코드)
    • swap check하는 부분
      • swap을 사용할 경우, /proc/swaps에서 두 번째 줄이 존재함
        swap 사용 시
      • swap을 사용하지 않는 경우, 두 번째 줄은 존재하지 않음
        swap 미사용 시

private registry 등록하기

docker 설정 추가

/etc/docker/daemon.json에 아래의 내용을 추가

    
    vi /etc/docker/daemon.json
    { "insecure-registries":["192.168.122.57:5000"] }
    

docker 설정 적용하기

    
    systemctl restart docker
    

이미지 준비

원하는 이미지를 docker hub에서 받아오기

docker pull {name}:{tag}

    
    docker pull nvidia/k8s-device-plugin:1.0.0-beta4
    

tar로 존재하던 이미지를 load하기

docker load -i {tar file name}

    
    docker load -i k8s-device-plugin.tar
    

이미지 push

image 이름을 변경하기

docker tag {name}:{tag} {private registry ip}:{port}/{name}:{tag}

    
    docker tag nvidia/k8s-device-plugin:1.0.0-beta4 192.168.122.57:5000/k8s-device-plugin:1.0.0-beta4
    

image 업로드하기

docker push {바꾼 이미지 이름}

    
    docker push 192.168.122.57:5000/k8s-device-plugin:1.0.0-beta4
    

결과 확인

registry에서 이미지 리스트 확인하기

    
    curl -X GET 172.21.3.6:5000/v2/_catalog
    

registry에서 이미지 tag 확인하기

    
    curl -X GET 172.21.3.6:5000/v2/k8s-device-plugin/tags/list
    

이 모든 것은 windows vm을 회사의 cloud 환경에 띄우기 위해 시작되었다.
이것을 하기 위해 cloud-init이 무엇인지 알게 되었고, 구글링하고 구글링하고 또 구글링하고…
구글링했던 지난 날이 아까워서라도 남겨놔야겠다.

cloud-init

cloud-init은 vm을 datasource를 기반으로 초기화하기 위해 vm 내부에서 동작하는 프로그램이다.
애석하게도 linux 계열의 guest OS만 지원하고, windows를 guest OS로 사용한다면 cloudbase-init을 설치해야 한다.
큰 뼈대는 cloud-init이나 cloudbase-init이나 동일하므로 cloud-init을 기준으로 설명하겠다.
(실제로도 cloudbase-init의 설명을 읽다보면 cloud-init을 기준으로 다른 점만 기술되어있는 느낌이다.)

datasource

datasource란 metadata와 userdata, 그리고 vendordata를 포함한 instance의 data를 의미한다.
metadata는 intstance 관리를 위해 cloud platform가 설정하는 정보로, instance id나 hostname, ssh-key 등을 설정할 수 있다.
userdata는 말그대로 사용자가 설정하는 데이터이고, user와 group, write_files, bootcmd/runcmd 등을 설정할 수 있다.
vendordata는 cloud platform이 정하는 userdata 급의 data로, 그 항목은 userdata와 동일하다. 이 때 이를 사용하고 말고는 사용자가 결정한다.

datasource의 종류

이 datasource를 얻어오는 방법은 크게 두 가지인데, local로 얻어오는 방법과 network로 얻어오는 방법이다.
local로 얻어오는 방법은 datasource를 iso파일로 생성하여 instance에 삽입한 것을 읽어오는 것이고,
cloud-init에서 분류하는 datasource 종류 중 NoCloud(cloud platform을 사용하지 않는 경우를 의미하며 cloud-config format 사용), Config Drive(Openstack format 사용), Alt Cloud(RHEvm, vShpere) 등이 있다.
network로 얻어오는 방법은 cloud platform이 제공하는 metadata service를 통해 얻어오는 방법이며,
Openstack, EC2, GCE, Azure, Aliyun 등 cloud platform의 종류별로 cloud-init이 구분하고 있다.

cloud-init 동작 과정

cloud-init은 각 모듈이 systemd의 service로 등록되어 instance의 booting 과정 중에 실행된다.
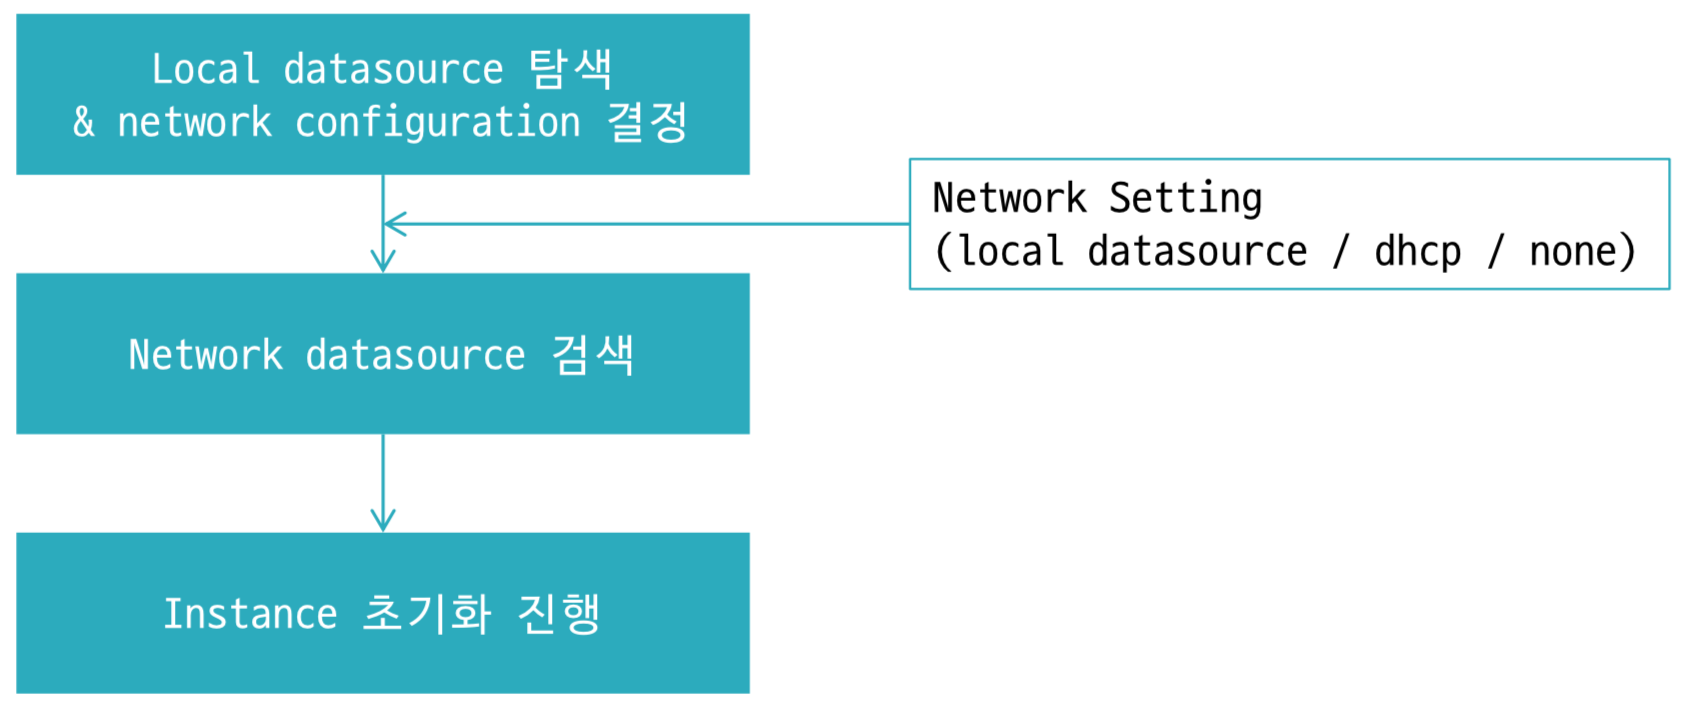
모듈별 동작은 크게 의미 없으니 다음 그림처럼 굵직하게만 살펴보겠다.

local datasource 탐색 & network configuration 결정

cloud-init이 실행되면 가장 우선적으로 local datasource를 탐색하고, 어떤 network configuration을 사용할 지 결정한다.
network configuration을 ‘결정’한다고 표현하는 것은, cloud-init은 netplan(ubuntu 18.04 기준)과 같은 네트워크 서비스에 설정을 집어넣는 역할까지만 하기 때문이다.
실제 network configure는 guest os의 네트워크 서비스가 해준다.
만약 local datasource가 존재하지 않는다면 fallback 로직을 타게 되는데, cloud-init에서는 이를 dhcp로 규정하고 있다.
사용자가 원하지 않는다면 cloud-init의 network configuration을 disable할 수도 있다.
이렇게 cloud-init이 결정한 network configuration을 바탕으로 guest os의 네트워크 서비스가 세팅을 해준 뒤에 cloud-init는 다음 작업을 수행한다.

network datasource 검색

local datasource가 있었다면 static이던 dhcp던 네트워크가 설정된 후 이 과정은 패스할 것이고,
local datasource가 없었다면 dhcp로 네트워크가 설정된 후 이 과정을 진행할 것이다.
cloud-init의 소스에는 datasource 종류별로 어떤 metadata service를 사용할 지 하드코딩되어있다.
(하드코딩이라도 표현해도 될지는 잘 모르겠다. 무튼 요지는 cloud-init이 지원하는 platform의 metadata service만 사용 가능하다는 점이다.)
이 부분은 잠시 뒤 metadata service에서 자세히 다뤄보겠다.

instance 초기화 진행

이제 얻어온 datasource를 바탕으로 instance를 초기화한다.

이와 같은 과정을 거쳐 cloud-init은 vm을 personalize한다.
이제 cloud-init을 설명하면서 여러 차례 언급되었던 metadata service에 대해 알아보자.

metadata service

metadata service는 instance를 관리하는 데에 필요한 정보를 검색하는 서비스이다.
cloud-init이 이 서비스를 instance를 초기화할 때 사용하는 대표적인 예일 뿐, 사용자도 해당 서비스를 사용하여 instance의 metadata를 조회할 수 있다.

metadata service 사용 방법

이 서비스는 rest api로 제공되는데, cloud platform별로 사용 방법이 다르다.

openstack의 경우 metadata를 파일로 한 번에 리턴해주지만, 대부분의 플랫폼은 metadata 항목마다 request를 보내어 그 값을 리턴받는다.
사용 방법은 각 공홈에 나와있는데, 대표적으로 ec2의 metadata service 사용방법을 읽어보면 감이 올 것이다.
여기에서 내가 궁금했던 것이 두 가지 있는데, 첫 번째는 openstack와 ec2의 metadata service는 왜 169.254.169.254를 사용하는가?였다.
이것은 GCE와 Aliyun은 저 ip를 사용하지 않는다는 것을 몰랐을 때 생긴 궁금증이라, 저 ip에 꽂혀서 삽질했던 지난 날을 생각하면… (부들부들)
그리고 두 번째는 이 http request에는 instance에 대한 아무런 정보도 없는데 metadata service가 이 instance specific한 어떻게 돌려주는가?였다.
우선 두 번째 의문부터 풀어보도록 하자.

openstack의 metadata service 동작 과정

instance를 특정짓는 과정을 알아보기 위해서는 metadata service가 어떤 방식으로 돌아가는 지 알 필요가 있다.
모든 플랫폼을 다 살펴볼 순 없으므로 openstack을 기준으로 조사를 했다.

(작성중…)